Receiving Order
- Overview
- Add Order
- Edit Order
- Cancel Order
- Close Order
- Add Line
- Add Detail
- Receive
- Unreceive
- Cross-Docking
- History
- Print Labels
- Receiving Order Reports
Required Permissions
- View Receiving Orders
- ability to search and view Receiving Orders
- Modify Receiving Orders
- ability to add, view, edit, cancel and close Receiving Orders
- Receive
- ability to add, edit order line details
- ability to receive stocks in Receiving Orders
- ability to use Assign To All functionality
- Unreceive
- ability to unreceive previously received stocks
- View Reports
- ability to print and export Receiving Order Reports
- View Cost
- ability to view Amount in the order header
- ability to view Unit Cost for lines and their details
- Modify Cost
- ability to view Amount in the order header
- ability to view and edit Unit Cost for lines and their details
Overview
Receiving is a process of the receipt of stocks from external vendors to the site. That means the physical receipt of items.
CoreIMS supports the receiving process through Receiving Orders (alternatively, you can add new stocks via Add Stock operation available from Inventory).
Add Order
- Go to Orders tab of the main menu.
- Select Receiving -> Add Order menu item.

The following window opens:
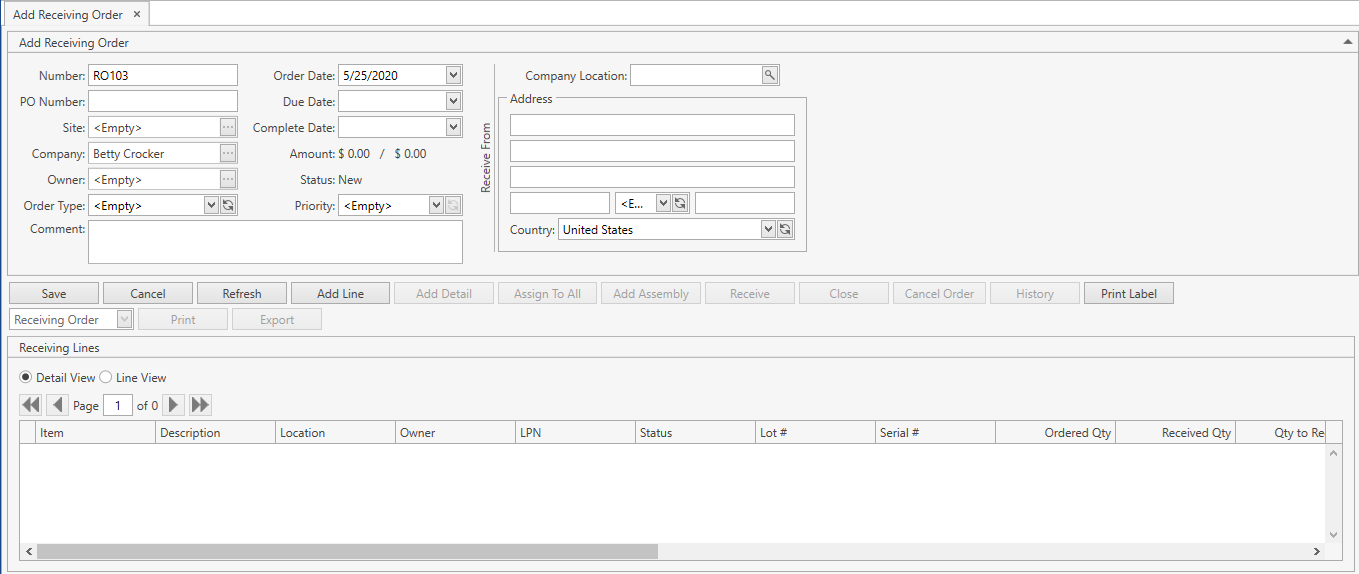
- Specify necessary attributes:
| Attribute | Required/Optional | Comment |
|---|---|---|
| Number | Required | Must be unique across the CoreIMS instance. Automatically prepopulated if Autonumbering Setting for Receiving Order is turned on. |
| PO Number | Optional | |
| Site | Required | Drop-down list of active Sites that you have access to. The necessary Site can be searched by the ellipsis button [...] as well. CoreIMS automatically prepopulates the field if you have a specified Default Site (refer to Users section). |
| Company | Required | Drop-down list of active Vendor Companies. The necessary Company can be searched by the ellipsis button [...] as well. |
| Owner | Optional | Drop-down list of active Companies marked as Owner. The necessary Company can be searched by the ellipsis button [...] as well. Visible only if Ownership mode is set up as Item Level or Stock Level in System Settings. If your CoreIMS user has an assigned Owner (refer to Users section), you will be able to specify only this Owner or leave the Receiving Order without an owner. |
| Order Type | Optional | Drop-down list of Order Types. |
| Comment | Optional | |
| Order Date | Required | CoreIMS prepopulates the field with the current date. You can change it, if necessary. |
| Due Date | Optional | |
| Complete Date | Optional | Non-editable; CoreIMS auto populates the field with the current date when the order gets into Closed status. |
| Shipping Order # | Optional | Visible for Return Orders only. Keeps a reference to corresponding Shipping Order the return is created against. |
| Amount: Total Ordered Cost/Total Received Cost | Required | Non-editable; CoreIMS auto populates the field according to the following: Total Ordered Cost = SUM (Unit Cost * Ordered Qty) of order lines Total Received Cost = SUM (Unit Cost * Received Qty) of order lines |
| Status | Required | Non-editable; CoreIMS auto populates the field with one of the following values: New, In Process, Closed, Canceled. |
| Priority | Optional | Drop-down list of the predefined system values: Rush, Low, Medium, High. |
| Receive From: Company Location/Name | Optional | CoreIMS prepopulates Company Location if Company has only one active address (refer to Companies section). |
| Receive From: Address | Optional | In case Company Location is not prepopulated, CoreIMS automatically prepopulates Country if Default country is specified in System Settings. For United States you can specify a state. For other countries city and postal code are accepted. |
| Custom Fields | Optional | If Receiving Order has any Active Custom Fields. |
Click Cancel button to reset the unsaved changes within the order header.
If you want to proceed with this new order, click Save button. The order will be saved in CoreIMS. Now you can edit the order.
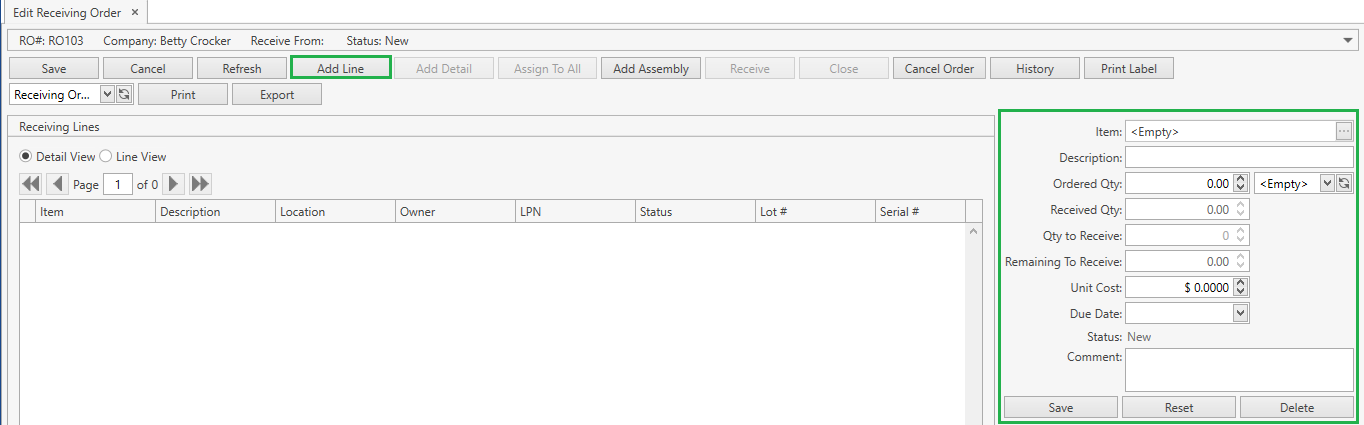
You can also save a new Receiving Order by clicking Add Line button:
- a new order will be saved;
- the order header will be collapsed – refer also to Orders: View Features section;
- the pop-up/frame for adding a new line will show up:
Edit Order
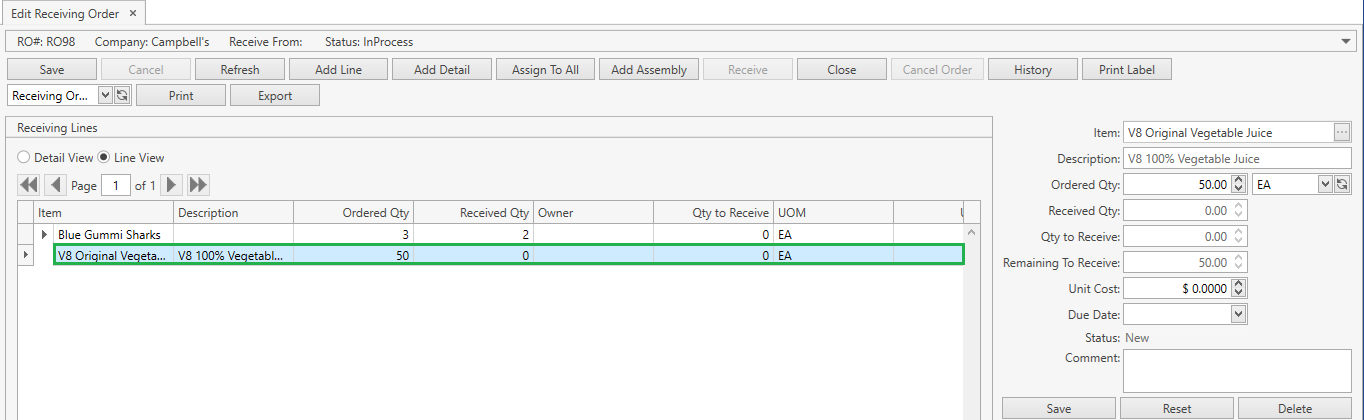
After saving the changes in Add Receiving Order tab, you will be redirected to Edit Receiving Order tab:

You can also get here from Search Receiving Order screen.
Refer to Orders: View Features section for the details on different view parameters.
Edit all the necessary order attributes.
Click Save button to apply the changes made within the order header.
Click Cancel button to reset the unsaved changes within the order header.
Note: this button just clears out the order header form, it does not cancel the order itself.
Click Refresh button to reset the unsaved changes in the order header and update the displayed Receiving Order with the up-to-date values.
Use the following buttons:
- Add Line – to add a new line to the order
- Add Detail – to add a new detail to the selected line
- Assign To All – to update all New details at once and add details to lines not yet closed
- Add Assembly – to add an assembly or it components as new order lines
- Receive – to process the order by receiving eligible lines
- Close – to manually close the order if there are any received details
- Cancel Order – to cancel the order if there are no received details
- History – to view Receiving Documents created for this order
- Print Label – to print a label for order lines or details
- Print or Export – to print/export reports
Cancel Order
The button is available if none of the line details were received, i.e. have status Received.
- Click Cancel Order button.
- Confirm the operation:

Once you confirm the operation, CoreIMS will do the following:
reset Ordered Qty for all order lines to 0;
delete details in status New;
assign to the order lines Closed status;
assign to the order Canceled status.
Even if the order was canceled, it is still available in CoreIMS and you can search, view and edit it.
Troubleshooting
- Cancel Order button is disabled.
Check statuses of order details – if at least one detail has status Received, Cancel Order button will be disabled.
Close Order
The button is available when the order is in status In Process and there is at least one received detail.
- Click Close Order button.
- Confirm the operation:

Once you confirm the operation, CoreIMS will do the following:
For the order:
- update Amount in the order header;
- assign to the order lines Closed status;
- assign to the order Closed status.
For the lines of non-service items:
- delete the details in New status;
- assign Ordered Qty = Received Qty.
For the lines of service items:
- create the respective detail in New status with Quantity = Received Qty - (Received Qty + Qty to Receive) if Quantity value is greater than 0;
- don’t delete detail of this Line in status New;
- assign this detail status Received;
- add the respective record to the last generated order's Receipt.
Troubleshooting
- Close button is disabled.
Check if the following condition is satisfied: the button is available when the order is in status In Process and there is at least one received detail.
Add Line
- Open the necessary order.
- Click Add Line button. The following window shows up:
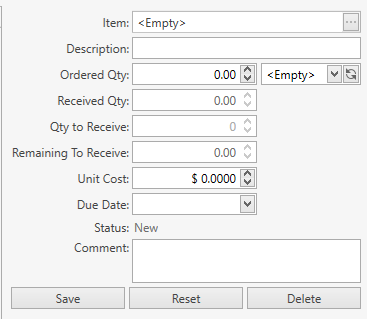
- Specify the line attributes according to the following:
| Attribute | Required/Optional | Comment |
|---|---|---|
| Item | Required | Drop-down list of active items. The necessary item can be searched by the ellipsis button [...] as well. If Ownership mode is set up as Item Level: if your User has an Owner (refer to Users section) and/or you selected an Owner in the order header, you will be able to select an item only of this Owner or without an owner. |
| Description | Optional | Non-editable; CoreIMS auto populates the field if the respective item has the specified description. |
| Ordered Qty: Qty + UOM | Required | You cannot enter the decimal quantity for serial-controlled items. CoreIMS auto populates UOM with Default Purchase UOM if it specified for the respective item. If Default Purchase UOM is not specified, CoreIMS auto populates UOM with the base UOM of Quantity UOM Class specified for the respective item. |
| Received Qty | Required | Non-editable; CoreIMS auto populates the field according to quantities and statuses of the line's details. |
| Qty to Receive | Required | Non-editable; CoreIMS auto populates the field according to quantities and statuses of the line's details. |
| Remaining To Receive | Required | Non-editable; CoreIMS auto populates the field according to quantities and statuses of the line's details. |
| Unit Cost | Optional | CoreIMS auto populates the field if Unit Cost is specified for the respective UOM in Item UOMs tab. |
| Due Date | Optional | |
| Status | Required | Non-editable; CoreIMS auto populates the field with one of the following values: New, In Process, Closed. |
| Comment | Optional |
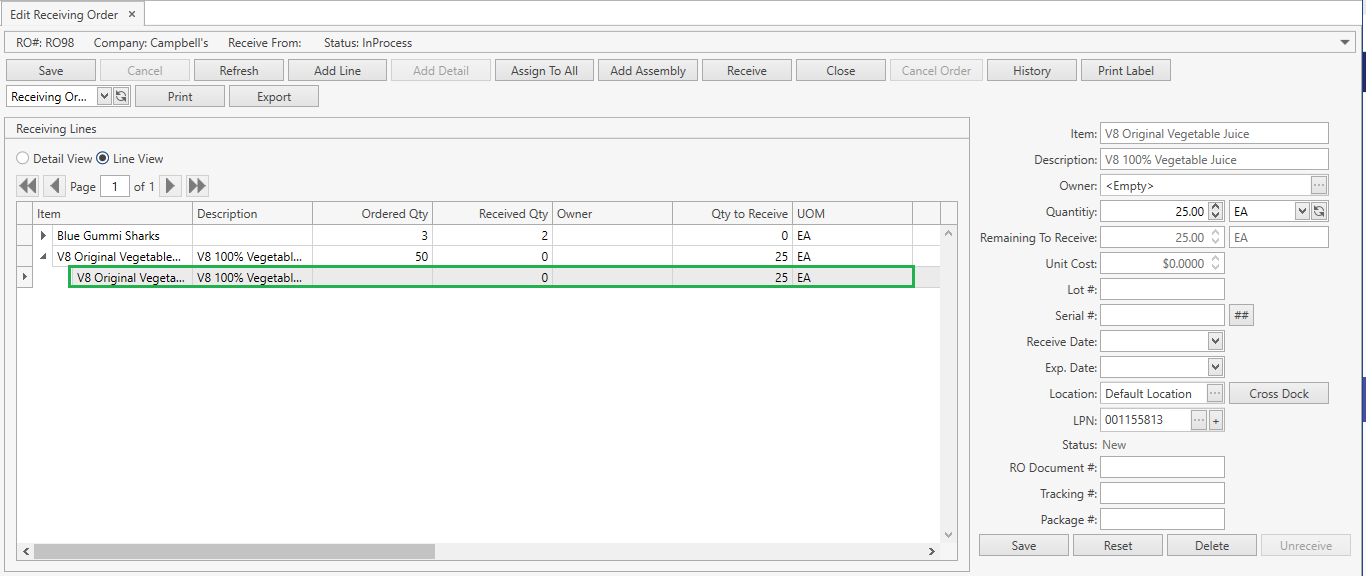
- Click Save button. A new line in New status will be added to the order:
- Click Reset button if you want to cancel adding of a new order line.
Add Assembly
You can also add an order line(s) by clicking Add Assembly button. This is a common functionality for orders. Refer to this section for details.
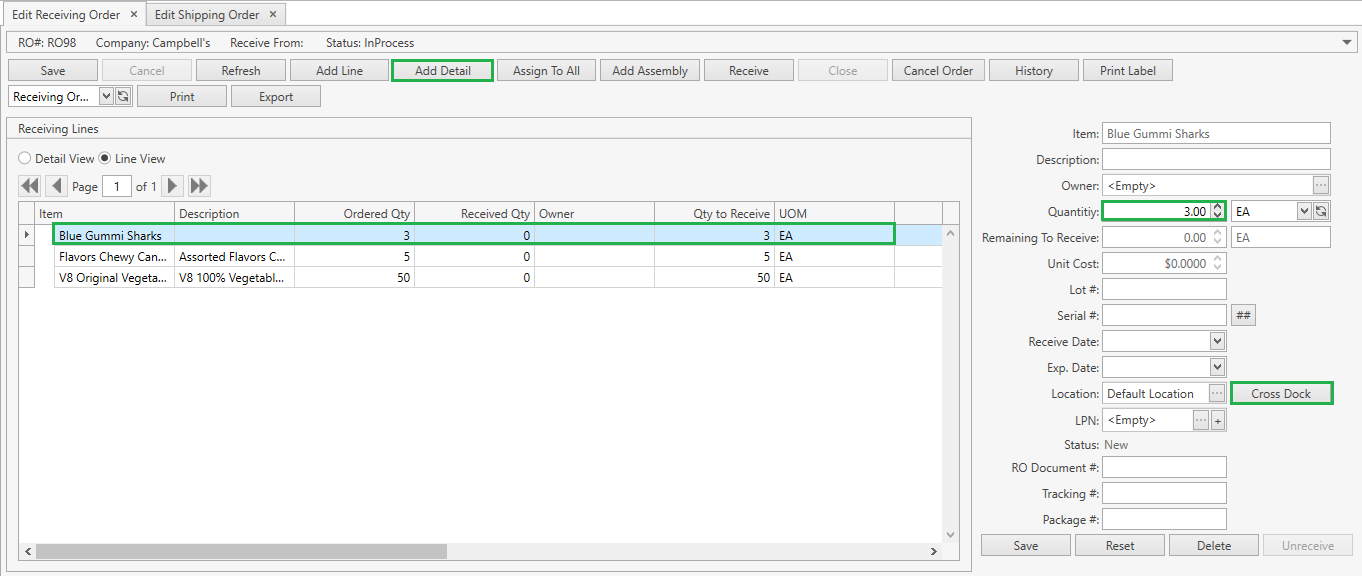
Add Detail
- Select the line you want to add a detail to.
- Click Add Detail button. The following window will show up:
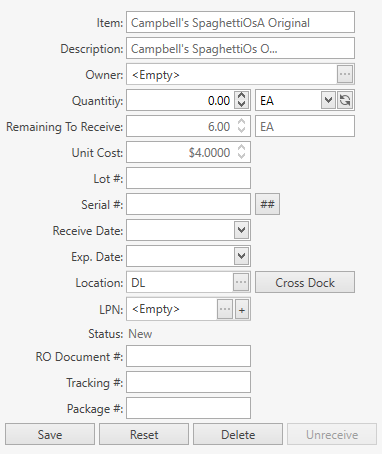
- Specify the detail attributes according to the following:
| Attribute | Required/Optional | Comment |
|---|---|---|
| Item | Required | Non-editable; CoreIMS auto populates the field with the respective item from the order line. |
| Description | Optional | Non-editable; CoreIMS auto populates the field if the respective item has a description. |
| Owner | Optional | If Ownership mode is set up as No: non-visible. If Ownership mode is set up Item Level: non-editable; CoreIMS auto populates the field with Owner of the respective item from the order line. If Ownership mode is set up Stock Level: a drop-down list of active Companies marked as Owner. The necessary Company can be searched by the ellipsis button [...] as well. If your CoreIMS user has specified Owner (refer to Users section) and/or you indicated Owner in the order header, you will be able to specify only this Owner or leave the detail without an owner. |
| Quantity | Required | For non-serial controlled items: CoreIMS prepopulates UOM field with the respective UOM from the order line. For serial-controlled items: CoreIMS prepopulates UOM field with the base UOM of Quantity UOM Class specified for the respective item. Qty is 1 by default and non-editable for you; CoreIMS automatically populates this field according to the quantity of serial numbers. |
| Remaining To Receive | Required | Autopopulated by CoreIMS from line attributes. |
| Unit Cost | Optional | Non-editable; CoreIMS auto populates the field with the respective Unit Cost from the order line. |
| Lot # | Required* | *If the item is lot-controlled. |
| Serial # | Required* | *If the item is serial-controlled. If Autonumbering Setting for Serial Number is turned on, you can generate Serial # for non-serial controlled items by clicking on  button near Serial # field. Refer to this section to view how to assign serial numbers for serial-controlled items. button near Serial # field. Refer to this section to view how to assign serial numbers for serial-controlled items. |
| Receive Date | Required* | *If FIFO or LIFO picking sequence is supported for the respective item. |
| Exp. Date | Required* | *If FEFO picking sequence is supported for the respective item. Autotopulated if Auto Fill Expiration Date option is enabled in System Settings. |
| Location | Required | CoreIMS prepopulates the field with Preferred Location if it is specified for the item within the Site from the order header. If not, the field is prepopulated with the Site's Default Location. |
| SO # | Required* | The field is visible and required if Cross Dock button is clicked. See Cross Docking for reference. |
| LPN | Optional | Drop-down list of LPNs located on the Site from the order header. The necessary LPN can be searched by the ellipsis button [...] as well. You can also add a new LPN. |
| Status | Required | Non-editable; CoreIMS auto populates the field with one of the values: New, Received. |
| RO Document # | Optional | Non-editable; CoreIMS auto populates the field once the detail was received with the respective number of Receipt. |
| Tracking # | Optional | Non-editable; CoreIMS auto populates the field only for Shipping Orders during the integration with the external carrier system (UPS) if Track Package is turned on in System Settings. |
| Package # | Optional | Non-editable; CoreIMS auto populates the field only for Shipping Orders during the integration with the external carrier system (UPS) if Track Package is turned on in System Settings. |
| Custom Fields | Optional | If Stock has any Active Custom Fields. |
- Click Save button. A detail in New status will be added to the order line:
- Click Reset button if you want to cancel adding of a new order detail.
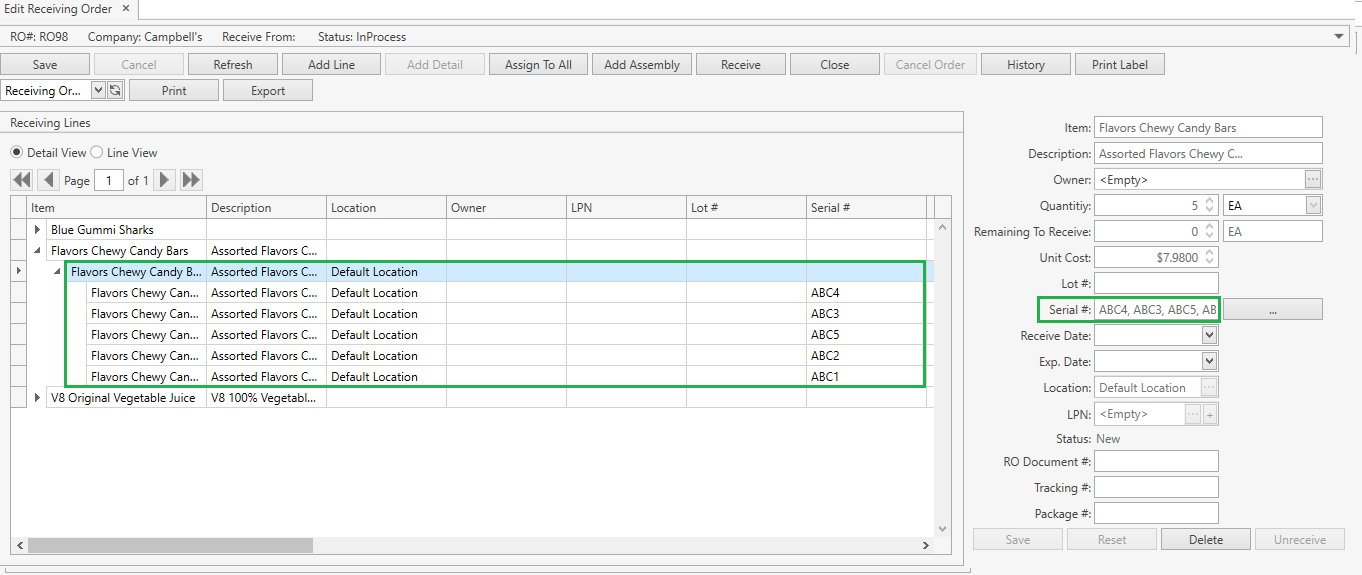
Add Detail for Serial-Controlled Items
- Select the line of the serial-controlled item you want to add a detail to.
- Click Add Detail button.
- Specify the detail attributes according to the section above.
- Enter manually serial numbers separated by comma or click on
 near Serial # field to assign serial numbers automatically (refer to this section for details):
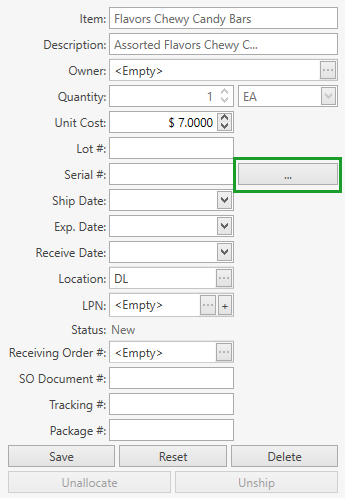
Once you saved the detail, CoreIMS automatically adds as many details as serial numbers you specified:
Assign To All
You can update the detail attributes and even add details in New status for all order lines within one transaction by clicking Assign To All button. This is a common functionality for orders. Refer to this section for details.
Add LPN
You can add a new LPN to the detail in New status that has not been received yet by clicking '+' button next to LPN field:
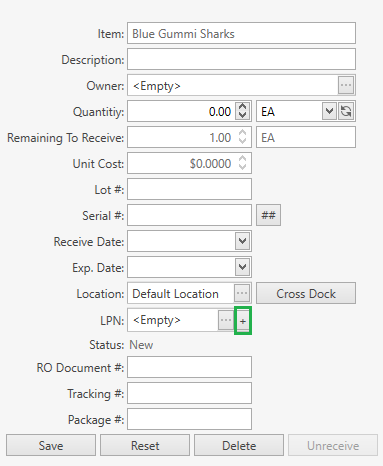
This is a common functionality for orders. Refer to this section for details.
Receive
- Add Order Lines.
- Then Add Details.
- Use Assign To All button if needed.
- Click Receive.
Select Receive Mode:
New Document: CoreIMS will generate a new Receiving Document (Receipt); you need to specify Receipt # – CoreIMS prepopulates Receipt # if Autonumbering Setting for Receiving Document is turned on.
Continue Document: CoreIMS will record the operation results into one of the Receiving Documents generated during the previous receiving operations within the current Receiving Order.
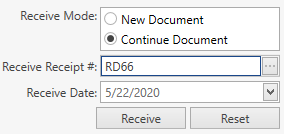
- Confirm the operation by clicking on Receive button. The received stocks will be created in Available status and you can access them from Inventory section.
- The received stocks will have information on the Receiving Order and the Receive Date if the corresponding options are enabled in System Settings.
- The received stocks will be put on hold if Hold Stocks On Receive option is enabled in System Settings.
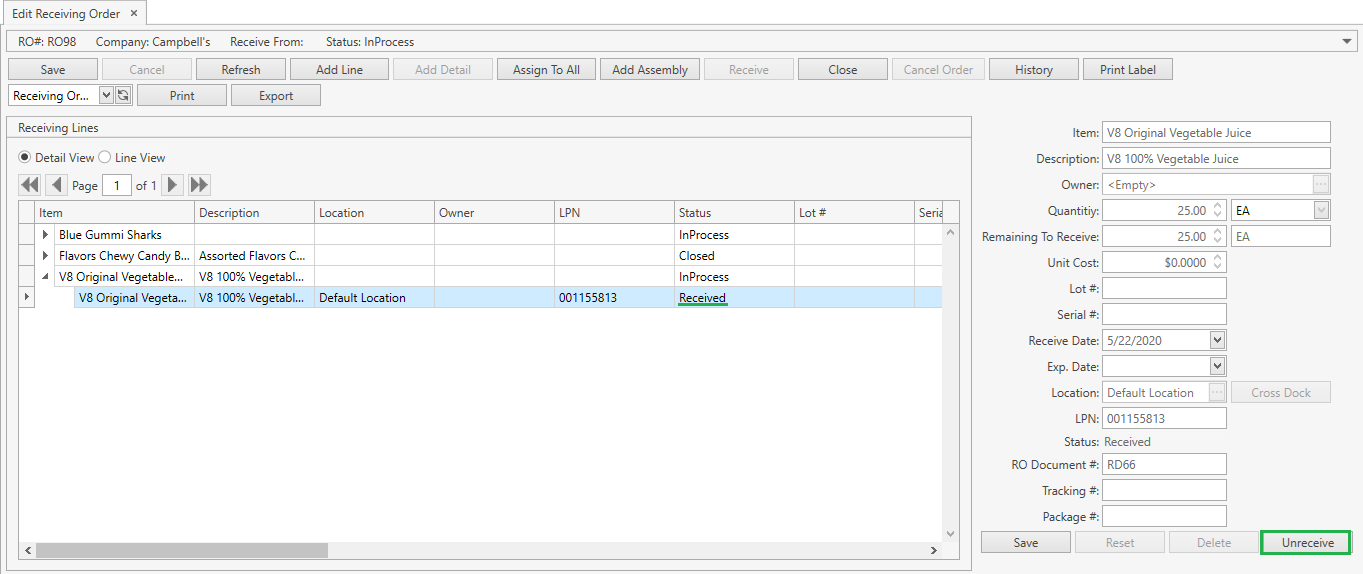
Unreceive
- Select an order detail in status Received.
- For serial-controlled items, expand the detail to see the sub-details with specific serial numbers.
- Click Unreceive button:
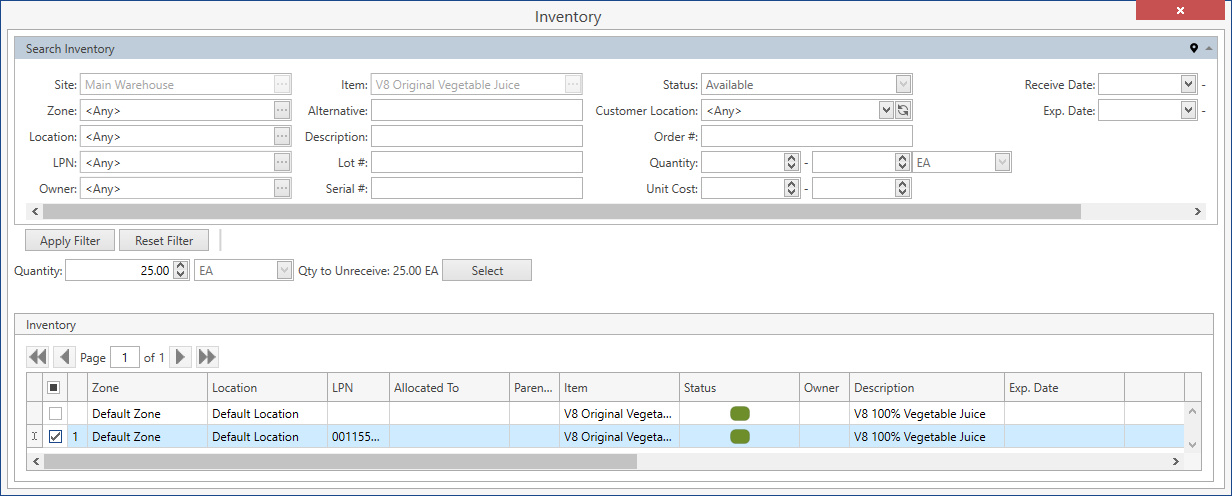
- Search Inventory window will open:
CoreIMS does not open up this window for details of serial-controlled items – the stock is selected automatically by Serial #.
Here you can see only stocks in status Available. Checkmark  a stock record with corresponding attributes, change the quantity to be unreceived, if needed, and click Select:

Alternatively, you can unreceive the necessary stock by simply double-clicking on it. Then CoreIMS will unreceive only the quantity that needs to be unreceived or the stock quantity in case it is less than the quantity to be unreceived.
CoreIMS will remove the details from the order line and update its Received Qty. The stock in specified quantity will be written off from the order Site.
Unreceive for Service Item
When you click Unreceive button for the details of service items, CoreIMS will do the following:
- Delete this record from Receipt.
- Change the detail status from Received to New.
- Set the line Quantity to Receive equal to Received Qty, e.g. first we received 5 EA and when unreceiving this, Quantity to Receive will be 5.
- Reset the line Received Quantity to 0.
Cross-Docking
Cross-docking is a feature allowing you to ship newly received stocks against a Shipping Order without allocation.
First make sure to do the following:
- Create a Shipping Order, add lines.
- Create a Receiving Order, add lines.
Note: both Shipping and Receiving orders must be created on the same Site and must have common items ordered.
To start the cross-docking operation, perform the following:
- Go to Receiving Order created.
- Pick a line to be received:
- click Add Detail
- optionally, specify Quantity
- click Cross Dock button:
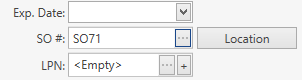
SO # field will appear instead of Location field:
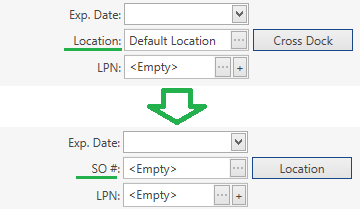
Note that you can click Location button to switch back to Location field.
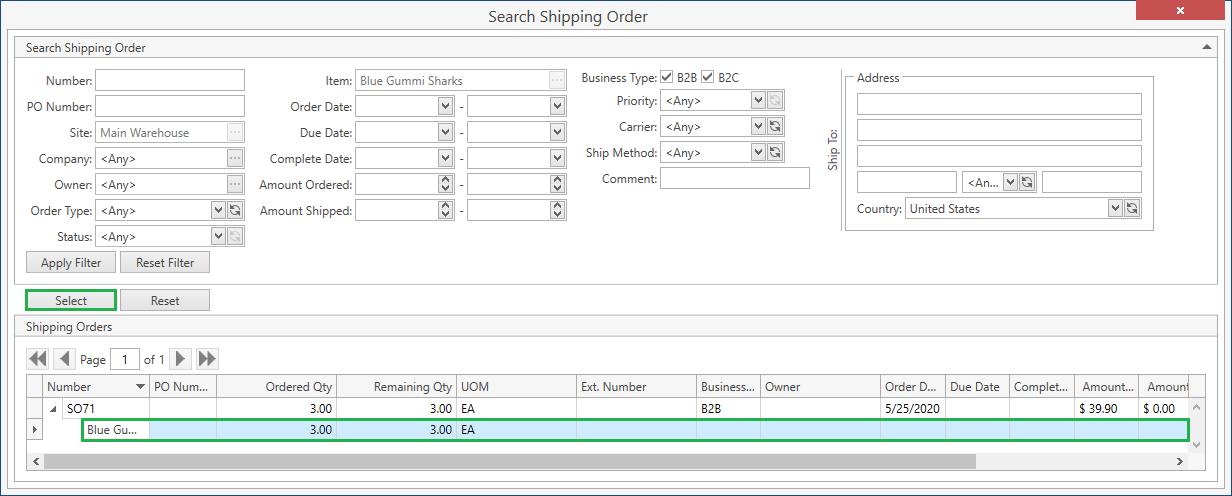
- Click [...] to select a Shipping Order:
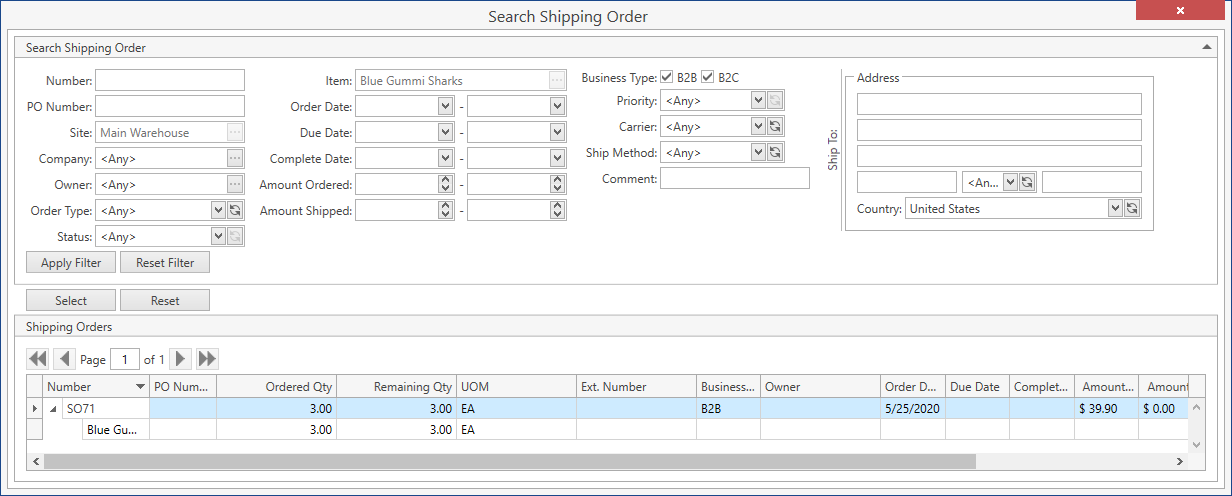
Remember that CoreIMS shows here only Shipping Orders that belong to the same Site as the Receiving Order and contain the same item.
- Select an order from the list.
Notes:
- Even if you're not permitted to create Shipping Orders, you will be able to choose existing ones.
- When a Shipping Order has multiple lines eligible for selected detail in the Receiving Order, CoreIMS will show all of them and you can select one.
- If detail Quantity hasn't been specified yet, it will be set according to Shipping Order's line Ordered Qty.
The SO # field will be populated with the number of the order specified:
Save the detail.
Proceed with the receiving process further. Refer to Receive section.
As a result, CoreIMS will do the following:
- in the related Shipping Order create a detail corresponding to the detail from Receiving Order;
- ship the Shipping Order detail:
- create new or update existing Shipment in Shipping Order;
- set the detail in status Shipped;
- log Receive and Ship transactions to Transaction History.
Note. If Remaining Qty from the Shipping Order line is less that Qty to Receive from the Receiving Order line:
- CoreIMS splits the Receiving Order detail into two details. One of them will have Received Qty = Remaining Qty of the Shipping Order line and Location = SO number; another one will have Received Qty = Qty to Receive - Remaining Qty of the Shipping Order line.
History
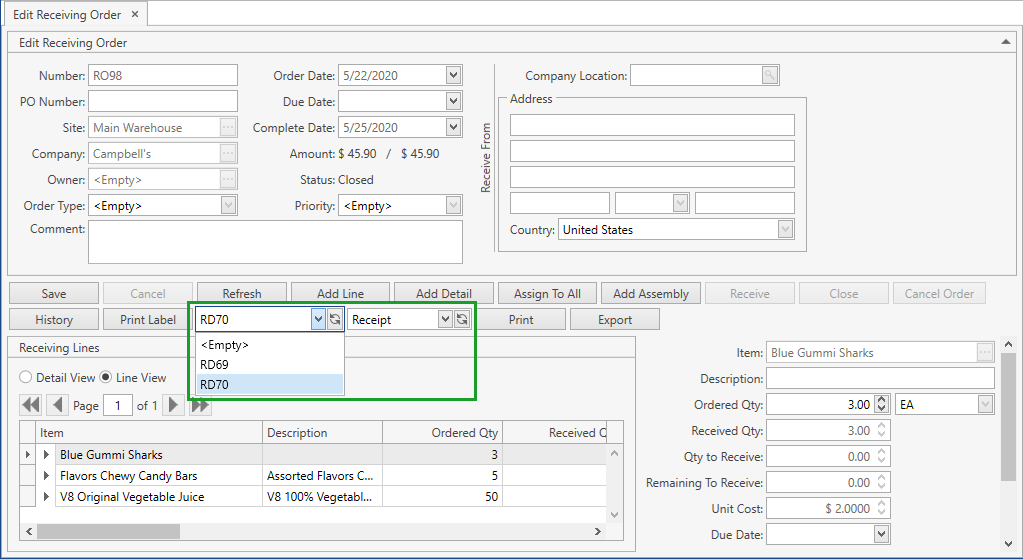
Use History button to access Receiving Documents (Receipts) generated for a Receiving Order:
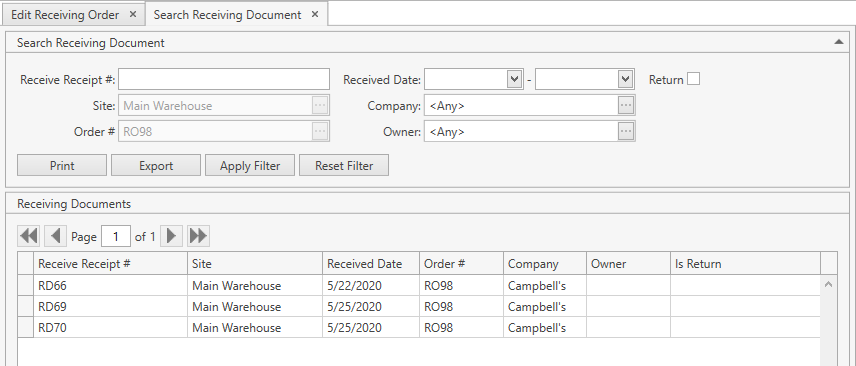
CoreIMS prepopulates Site and Order # fields and makes them disabled as you're accessing Search Receiving Document window through the specific Receiving Order. This means that you will be able to see Receiving Documents only of this order.
Refer to Search Receiving Document section to view the operations you can perform from Search Receiving Document screen.
Print Labels
You can print a label for the order line(s)/detail by clicking Print Label button. This is a common CoreIMS functionality. Refer to this section for more info.
Receiving Order Reports
You can print or export Receiving Order reports. These reports are available from the drop-down list in the order control panel:
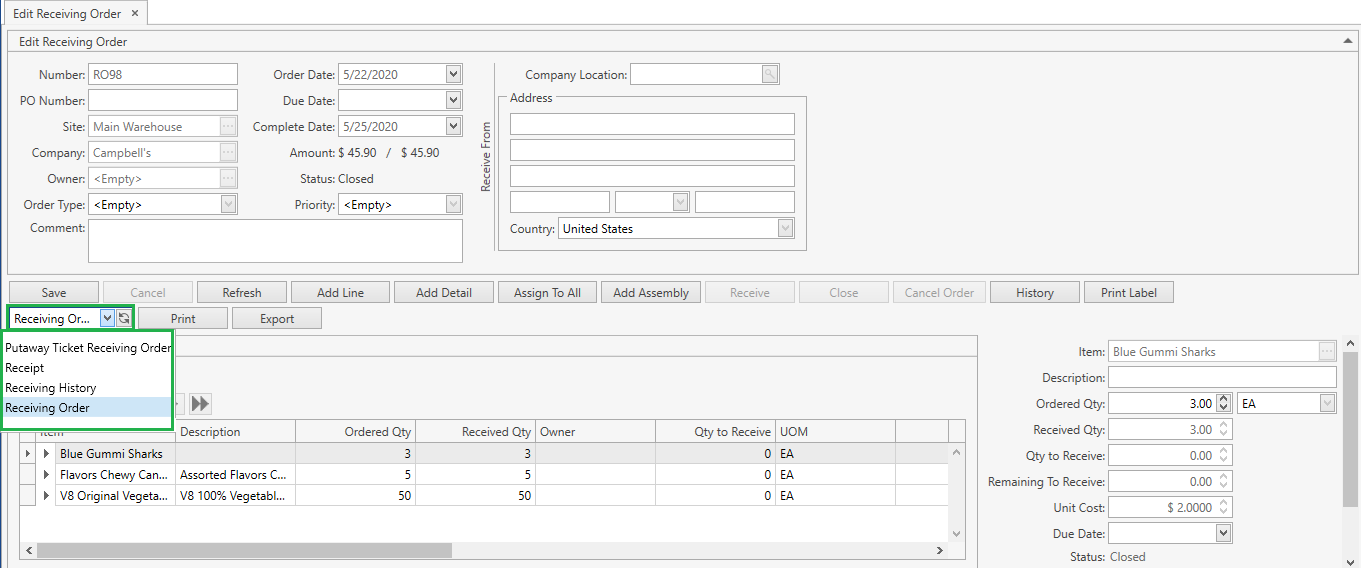
Select one of the following reports and click Print or Export button:
Putaway Ticket Receiving Order: Report displays a list of received stocks that should be placed to the specified Location/LPN in the warehouse.
Receiving History: Report displays the data on all receiving operations within the current Receiving Order with the detailed information of each Receipt.
Receiving Order: Report shows the information on the order header and lines.
Receipt: Report shows the information on selected Receiving Document, i.e. Receipt. You should select the exact Receipt to be printed/exported: