Inventory Operations
- Search Inventory
- Add Stock
- Edit Stock
- Group Move
- Group Hold
- Group Release
- Transfer
- Receive
- Print Labels
- Inventory List Report
- Clickable Link to Orders
- Add LPN
Required Permissions
- View Inventory
- ability to view stocks (inventory) on Inventory screen
- Adjust Inventory
- ability to add new stocks, adjust stock quantity and attributes, break UOM
- Move Inventory
- ability to move stocks and LPNs
- Hold Inventory
- ability to hold and release stocks and LPNs
- Manage LPNs
- ability to view, add, delete LPNs
- Ship Transfer
- ability to transfer stock on Inventory screen
- Receive Transfer
- ability to receive stock on Inventory screen
- View Cost
- ability to view Unit Cost on Inventory screen
- Modify Cost
- ability to view and edit Unit Cost on Inventory screen
- View Reports
- ability to print and export reports from Inventory screen
Search Inventory
- Go to Inventory tab of the main menu and select the first menu item:

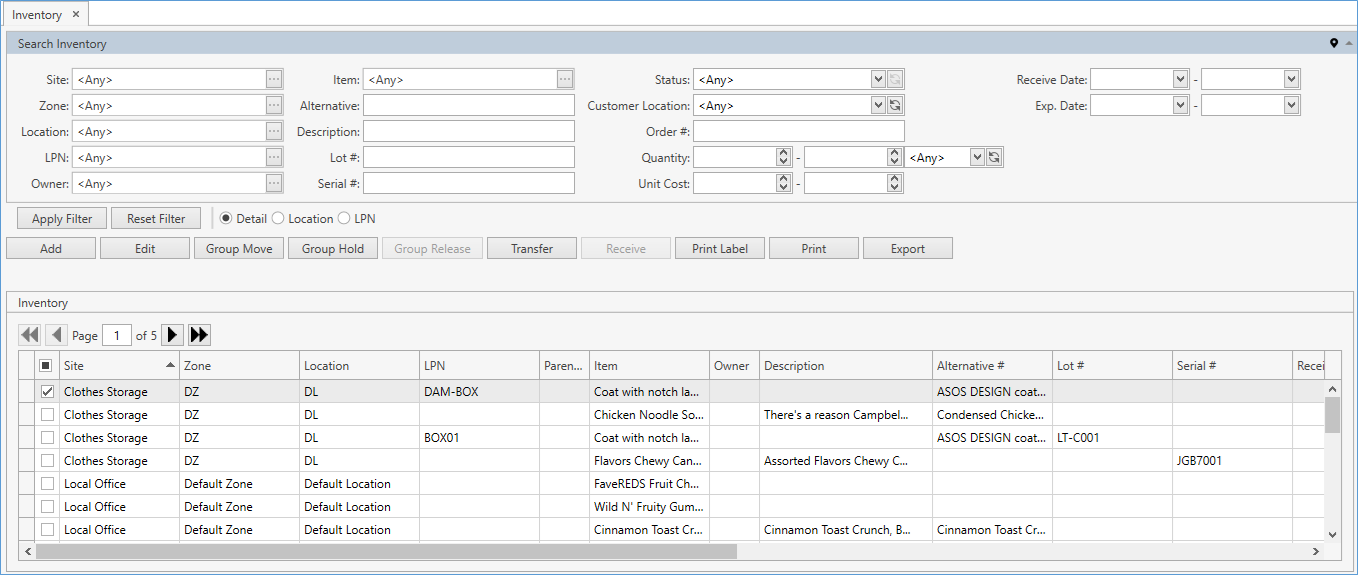
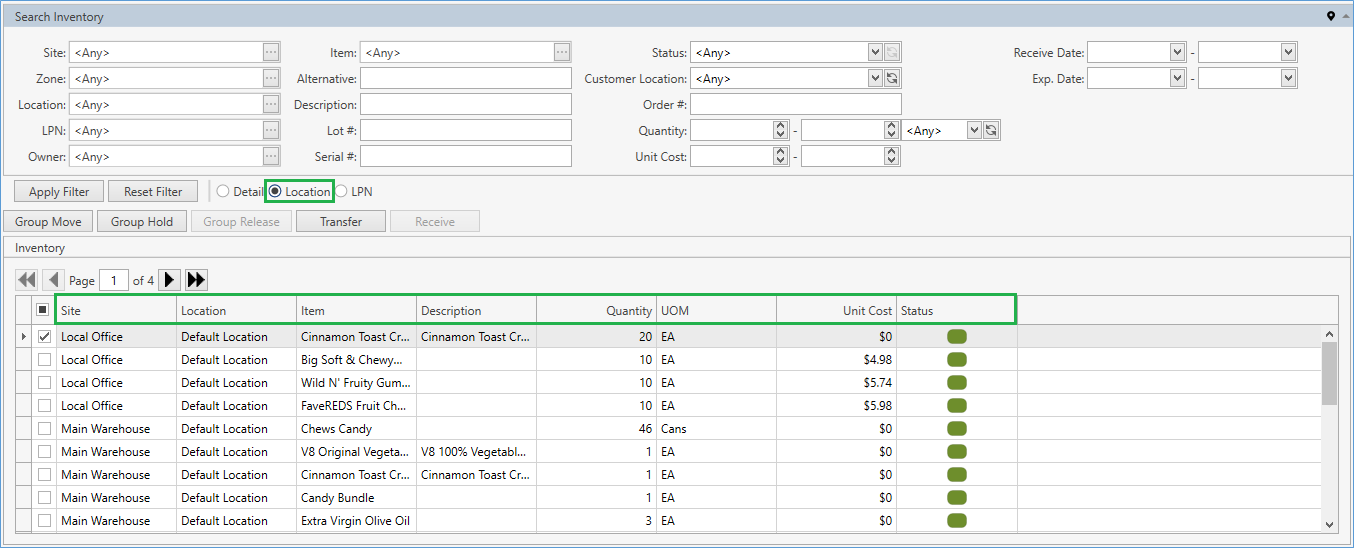
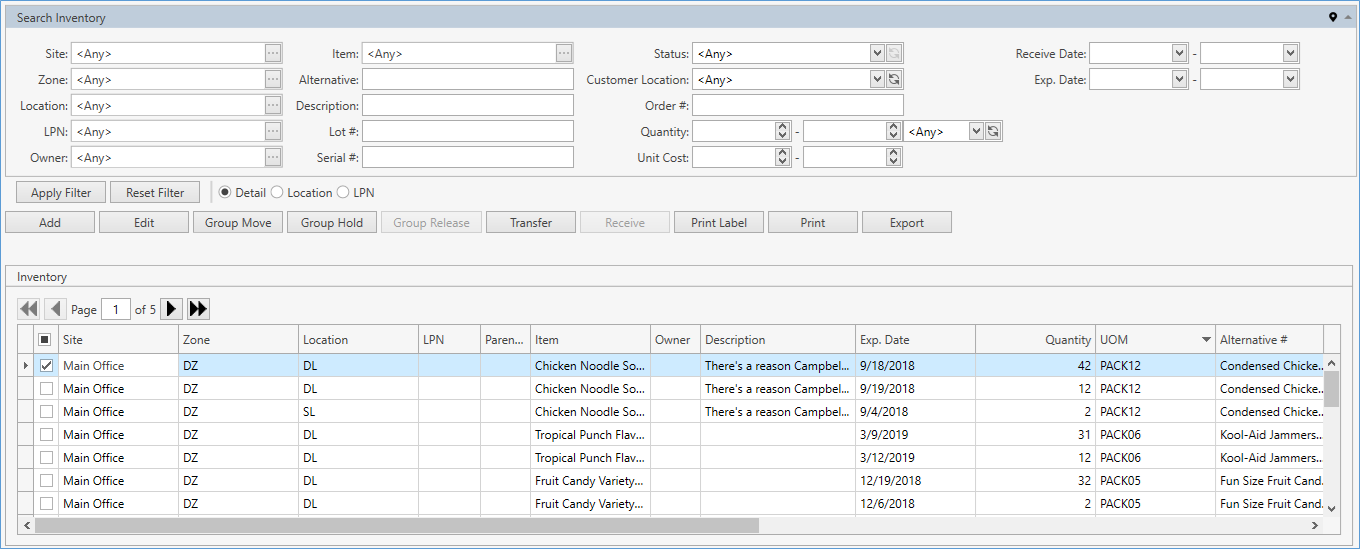
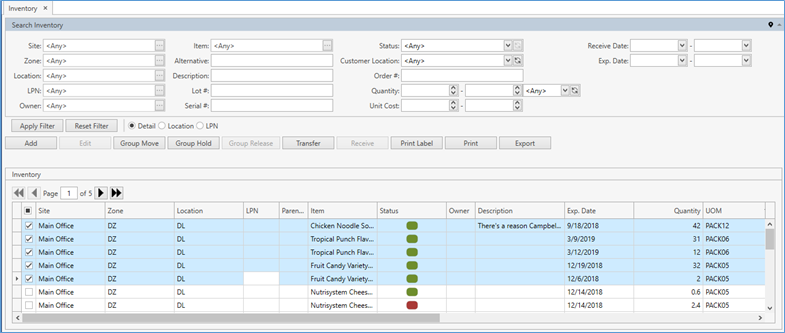
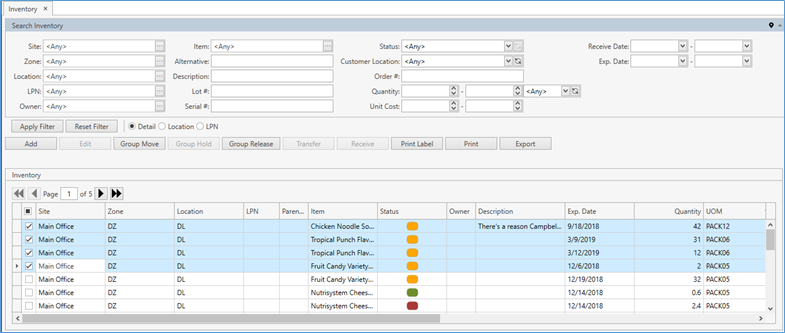
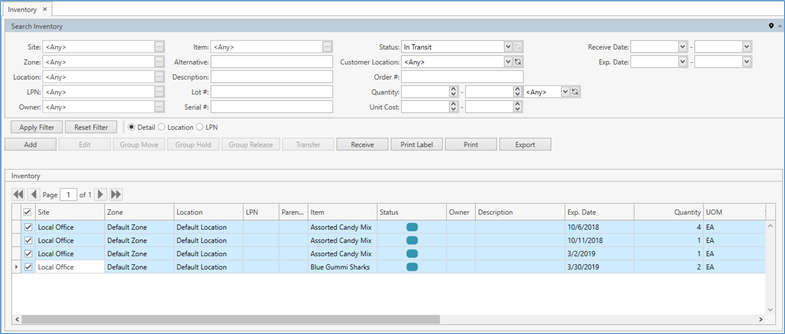
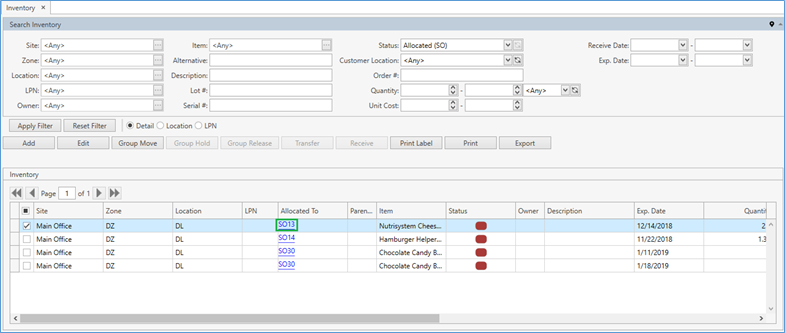
- The following window displaying the inventory opens:
- Specify the necessary search criteria in Search Inventory frame:

The following optional filters can be applied:
| Filter | Comment | |
|---|---|---|
| Site | Drop-down list of active Sites that you have access to. The necessary Site can be searched by the ellipsis button [...] as well. CoreIMS automatically prepopulates the field if you have a specified Default Site (please refer to Users section). | |
| Zone | Drop-down list of active Zones on the selected Site. Use the ellipsis button [...] to search for Zones. | |
| Location | Drop-down list of active Locations on the selected Site. Use the ellipsis button [...] to search for Locations. | |
| LPN | Drop-down list of LPNs. Use the ellipsis button [...] to search for LPNs. | |
| Owner | Drop-down list of active Companies marked as Owner. The necessary Company can be searched by the ellipsis button [...] as well. Visible only if Ownership mode is set up as Item Level or Stock Level in System Settings. If your CoreIMS User has an assigned Owner (please refer to Users section), you will be able to search for stocks only of this Owner or without owner. |
|
| Item | Drop-down list of active items. The necessary item can be searched by the ellipsis button [...] as well. Multiple Select is supported. If Ownership mode is set up as Item Level in System Settings and you (your CoreIMS user) have a specified Owner (please refer to Users section), you will be able to search stocks for item(s) only of this Owner or without owner. |
|
| Alternative | ||
| Description | ||
| Lot # | ||
| Serial # | ||
| Hold Reason | Drop-down list of values defined in Setup. Visible if On Hold status is selected (see below). | |
| Status | Drop-down list of the predefined system values: Available, On Hold, In Transit, Allocated (SO), Allocated (TO), Allocated (WO), Allocated (MWO). | |
| Customer Location | Drop-down list of the values defined in Company Management. | |
| Order # | If stock has a reference to an order, specify its number here. Depending on the order type, the found order number will be reflected in one of the grid fields: Allocated To, Build WO Number, Receiving Order #. The latter will be visible if Track Receiving Order # option is enabled in System Settings. | |
| Quantity | Stock quantity range with the UOM selector. | |
| Unit Cost | Stock unit cost range. | |
| Receive Date | Date range. | |
| Exp. Date | Date range. | |
| Custom Fields | If Stock has any Active Custom Fields. |
CoreIMS allows you to do the following when searching:
1) search by the beginning or by any part of text fields;
2) hide/unhide search filters;
3) collapse/expand the filter area;
4) fasten/unfasten the filter area.
- Once you specify all necessary filter criteria, click Enter or Apply Filter button.
The results that satisfy the search criteria will be loaded to Inventory frame:
If needed, reset previously specified filter criteria by clicking Reset Filter button.
Use navigation buttons
 to switch the pages of the grid.
You can also customize the view of the grid and use Ctrl+F for searching.
View Modes
CoreIMS allows you to break down stock records using view modes:
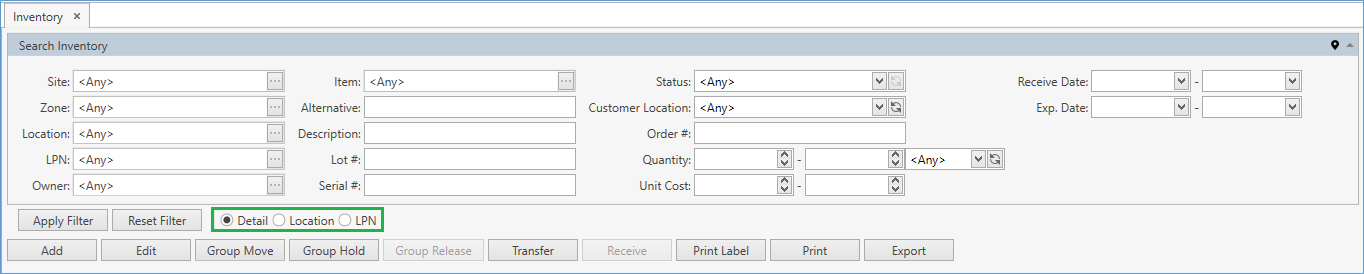
Choose one of the following options:
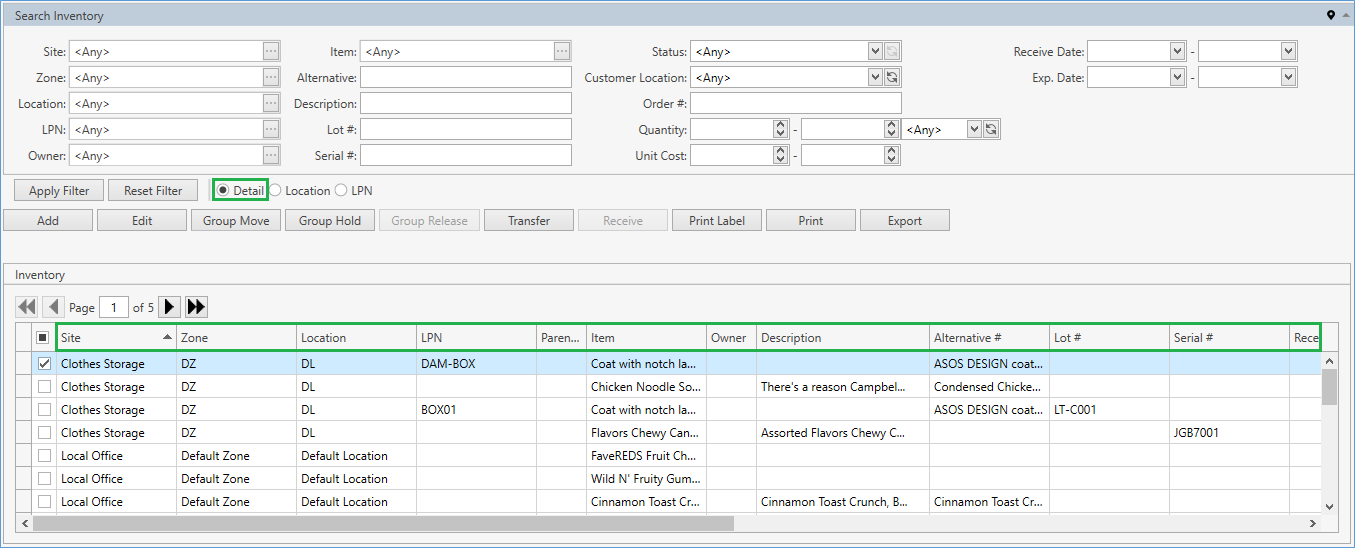
Detail – this view mode is selected by default, producing definitive inventory info ordered by stock details including Zone, Location, LPN, Lot/Serial#, Receive/Exp. Date, and various stock custom fields:
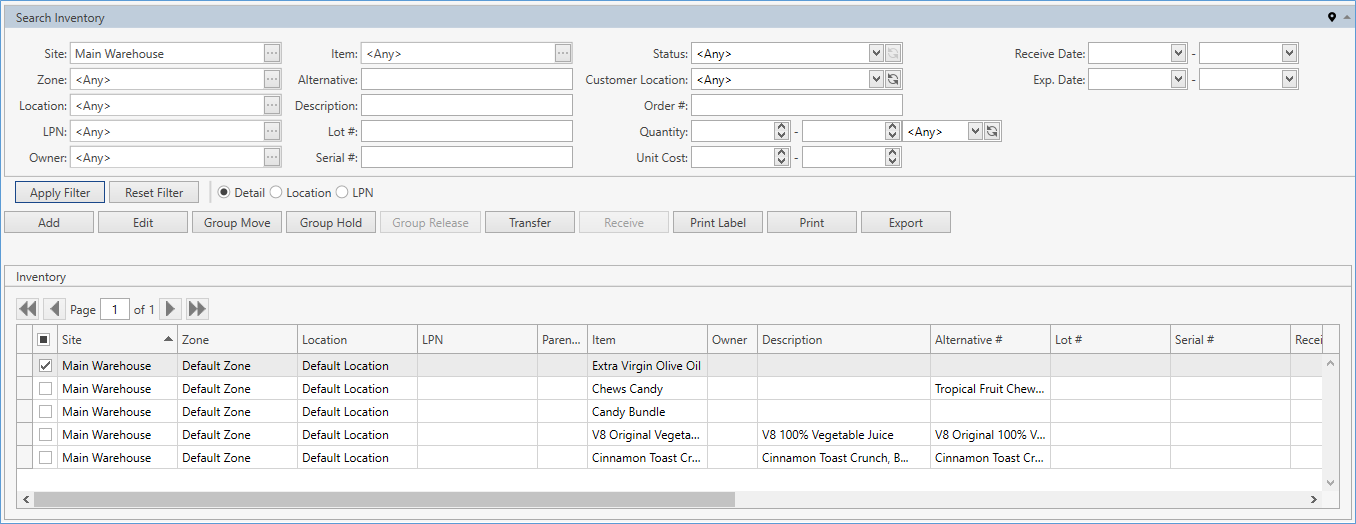
Location – brief inventory info on the stock quantity and which Location the stock is stored in:
LPN – the existing LPNs with stock quantity information are shown:

Note. Inventory workflows described below reflect Detail view mode. Though Location and LPN modes include only a part of controls and buttons used in the Detail mode, once you have learned how to work with the Detail mode, there will be no difficulty for you to work in other view modes.
Negative Stock Quantity
You may encounter stocks with negative quantity in CoreIMS. This happens if Allow Negative Stocks option is enabled in System Settings.
The stocks with negative quantity can be created within the shipping process.
Merge Stock
When performing inventory operations described below, CoreIMS checks stock attributes:
- if two stock records with same attributes found, the two records are merged into one.
Example: we've got 8 EA of Item-1 on LPN-1. Then we're adding 2 EA of Item-1 on LPN-1 -> this will result in a single 10 EA of Item-1 on LPN-1.
- otherwise, a new stock record is created.
Add Stock
- Click Add button on the inventory control panel to see the following window:
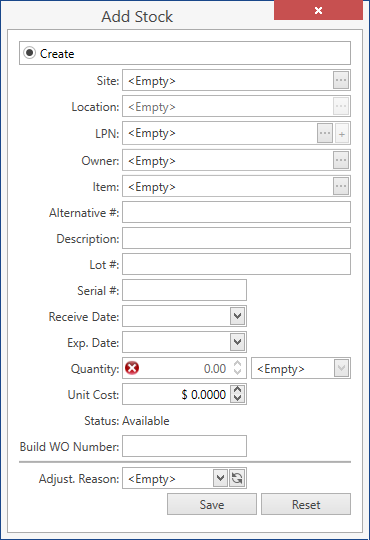
- Specify the necessary attributes:
| Attribute | Required/Optional | Comment |
|---|---|---|
| Site | Required | Drop-down list of active Sites that you have access to. The necessary Site can be searched by the ellipsis button [...] as well. CoreIMS automatically prepopulates the field if you have a specified Default Site (please refer to Users section). |
| Location | Required | Drop-down list of active Locations on the selected Site. Also use the ellipsis button [...] to search for Locations. |
| LPN | Optional | Drop-down list of LPNs on the selected Site and Location. Also use the ellipsis button [...] to search for LPNs. You can Add LPN here. |
| Owner | Optional | Visible only if Ownership mode is set up Stock Level: a drop-down list of active Companies marked as Owner. The necessary Company can be searched by the ellipsis button [...] as well. If your CoreIMS user has a specified Owner (refer to Users section), you will be able to specify only this Owner or leave the stock without an owner. |
| Item | Required | Drop-down list of active items. Also use the ellipsis button [...] to search for items. If Ownership mode is set up as Item Level in System Settings and you (your CoreIMS user) have a specified Owner (please refer to Users section), you will be able to search for items only of this Owner or without an owner. |
| Alternative # | See comment | Non-editable; autopopulated from the item attributes. |
| Description | See comment | Non-editable; autopopulated from the item attributes. |
| Lot # | Required* | *Required if you are adding a stock of the lot-controlled item. |
| Serial # | Required* | *Required if you are adding a stock of the serial-controlled item. Specify serial numbers or use  button to generate multiple serial numbers. See Assign Serials for details. button to generate multiple serial numbers. See Assign Serials for details.If Autonumbering Setting for Serial Number is turned on, you can generate Serial # for non-serial controlled items by clicking on  button near Serial # field. button near Serial # field. |
| Receive Date | Required* | *Required if FIFO/LIFO picking sequence is supported for the respective item. |
| Exp. Date | Required* | *Required if FEFO picking sequence is supported for the respective item. |
| Quantity | Required | For serial-controlled items: Qty is 1 by default and non-editable for you; CoreIMS automatically populates this field according to the quantity of specified serial numbers. |
| UOM | Required | CoreIMS auto populates UOM with Default Purchase UOM if it specified for the respective item. If Default Purchase UOM is not specified or item is serial-controlled, CoreIMS auto populates UOM with the base UOM of Quantity UOM Class specified for the respective item. For serial-controlled items UOM field is not editable. |
| Unit Cost | Optional | CoreIMS auto populates the field if Unit Cost is specified for the respective UOM in Item UOMs tab. |
| Status | Required | When adding stock, the status is always Available. |
| Build WO Number | Optional | Non-editable; CoreIMS automatically populates this field if the stock was built within Kitting or Manufactruring Work Order. |
| Adjustment Reason | See comment | Drop-down list of the values defined in Configuration section. The field is required if Adjustment Reason Required option is enabled in System Settings. |
Click Save to register a new stock in CoreIMS.
Click Reset to cancel adding of a new stock.
Assign Serials
When adding stock for a serial-controlled item:
- Enter manually serial numbers separated by comma or click on next to Serial # field. Assign serial number pop-up will show up:
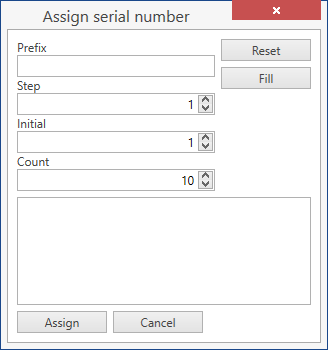
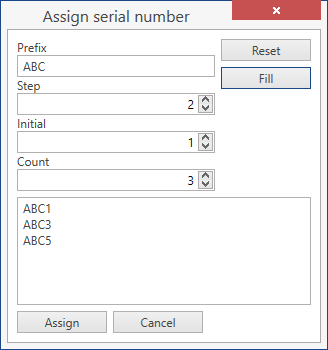
Specify the parameters of the template for the autogeneration of serial numbers:
- Prefix: this is a basis for all the generated serial numbers. E.g. ABC1, ABC3, ABC5.
- Step: 1 by default. Specify another number if you want serials to have a +n sequence. E.g. if you specify Step as 2 and Initial as 1, CoreIMS will generate numbers 1, 3 and 5.
- Initial: 1 by default.
- Count: how many serial numbers you need to generate; 10 by default.
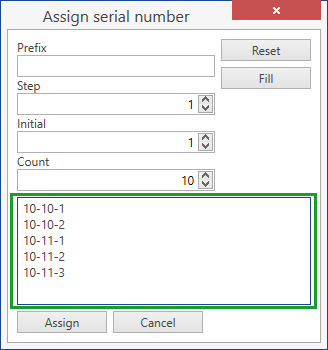
Click Fill button to generate serial numbers according to the specified template:
- You don't necessarily need to generate serial numbers automatically. You can manually enter serial numbers in the box shown below:
Remember that you should place each serial number in a separate line.
Click Reset button to reset serial numbers that were autogenerated/entered manually.
Click Cancel button to cancel the whole operation.
Click Assign button to have CoreIMS populate Serial # field with the specified serial numbers:

When adding stock, CoreIMS will generate as many serials as there were specified in Serial # field above.
Edit Stock
Click on a record:
You will see that it's highlighted and checked  on the grid. Click Edit button:
Alternatively, you can just double-click on a grid record.
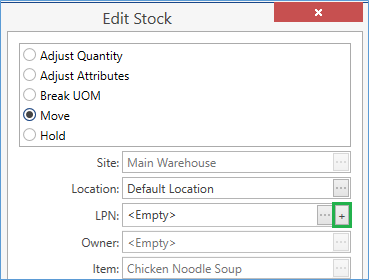
Edit Stock opens:
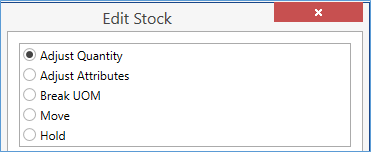
Select one of the options:
The list of available operations depends on the stock status. For example, none of these options are available for stock in status In Transit.
Adjust Quantity
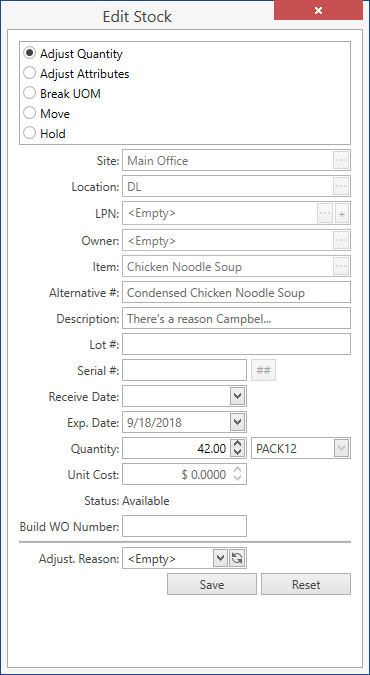
You can modify only stock quantity here. All the other fields are read-only.
- Provide Quantity: the new value must be greater than 0.
- Serial-controlled stock's quantity can be adjusted from 1 to 0 only.
- Select Adjust. Reason.
- The field is required if Adjustment Reason Required option is enabled in System Settings.
- Click Save button.
Adjust Attributes
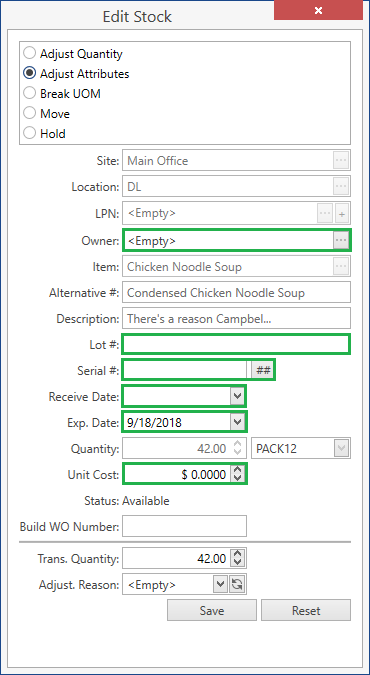
Adjust stock attributes:
- Owner. Visible only if Ownership mode is set up as Stock Level in System Settings.
- Lot #
- Serial #. Remember that the serial number must be unique across all the stock records of the respective item.
- Receive Date
- Exp. Date
- Unit Cost
- Custom fields. Visible if Stock has any Active Custom Fields.
Specify how much of a stock is going to be affected in Trans. Quantity field.
- Select Adjust. Reason.
- The field is required if Adjustment Reason Required option is enabled in System Settings.
- Click Save button.
Break UOM
This operation converts current stock UOM into base UOM, recalculates stock Quantity & Unit Cost.
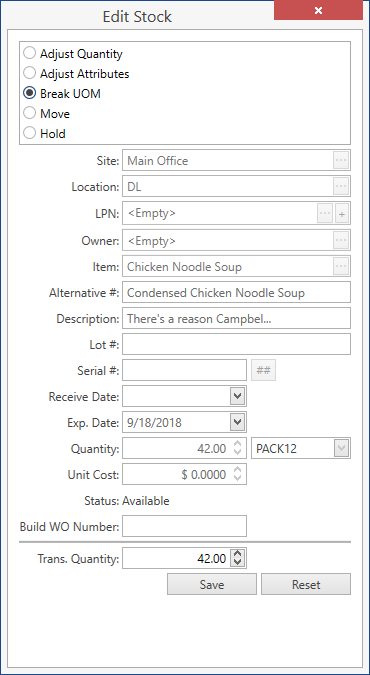
Note: this option is only available for non-serialized stock in status Available or On Hold in non-base UOM.
Example. EA is a base UOM with multiplier 1, PACK12 has multiplier 12. Break UOM will be available for stocks in PACK12 UOM.
Refer also to Multipliers section.
- Specify Transaction Quantity,
- If you specify a value less than existing stock quantity, CoreIMS will split the stock into two.
- As a result, the affected quantity will be converted into Base UOM. E.g.: 2 PACK12 stocks will be converted into 2*12=24 EA.
- Click Save button.
Move
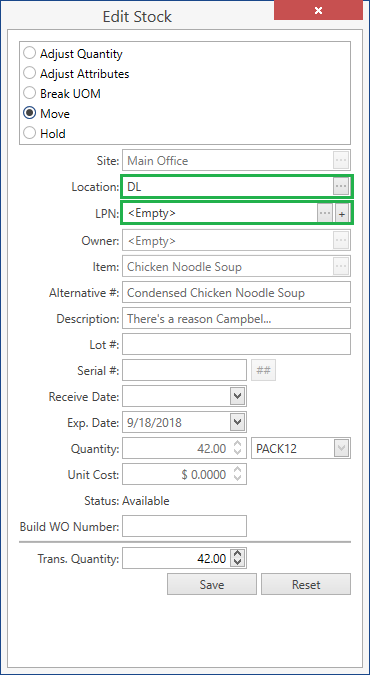
Note. You can move stocks that have one of the following statuses: Available, Hold, Allocated.
Select a Location or an LPN you'd like to move stock to,
- If you select an LPN only, Location field will be populated automatically.
- You can type in a new LPN code or add LPN – on move, CoreIMS will create it on the selected Location.
In Trans. Quantity field specify how much you are going to move.
- Moving a part of the stock from LPN will result in taking it off the LPN and moving the loose stock. The source LPN will stay where it was before the movement.
- Click Save button.
Hold
Put a stock on hold to mark it with special tag (e.g. expired), so that it will not be Shipped or Transferred.

Note. You can hold stocks only in status Available.
- If needed, provide Hold Reason.
- In Trans. Quantity field specify how much you are going to hold.
- Click Save button.
- As a result, the stock status will be On Hold.
Release
This is an opposite operation to the hold one, see above.
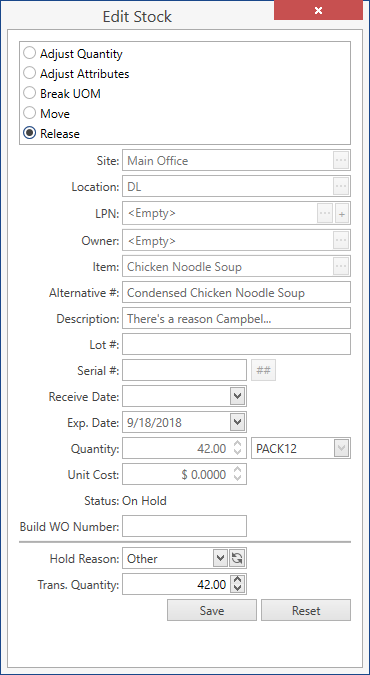
Note. This option is only visible and available for stocks in status On Hold.
- Review why the stock had been put on hold in Hold Reason field.
In Trans. Quantity field specify how much you are going to release.
Click Save button.
- As a result, the stock status will be Available.
Group Move
This operation moves the entire quantity of the selected stock group from one Location/LPN to another on the same Site. The operation is also available in Location and LPN View Modes.
- Select stocks you are going to move:
- checkmark
 records on the Inventory grid
 - or press Ctrl on keyboard and select records, one by one, by clicking on any place in a record line. Shift selection works too.
- checkmark
Hints:
- Select only stocks from the same Site.
- Stock with negative quantity should not be selected.
Select only stocks in one of the statuses: Available, On Hold, Allocated.
Click Group Move to see Move Inventory window:
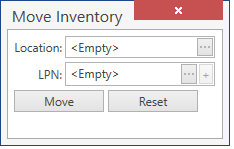
Select a Location or an LPN you'd like to move a group of stocks to. Click [...] button for that.
- If you select an LPN only, Location field will be populated automatically.
- You can type in a new LPN code or add LPN – CoreIMS will create it on the selected Location.
Confirm the operation by clicking Move button.
Troubleshooting:
- Group Move button is disabled.
a. This can happen if at least one of the selected stocks has the negative quantity.
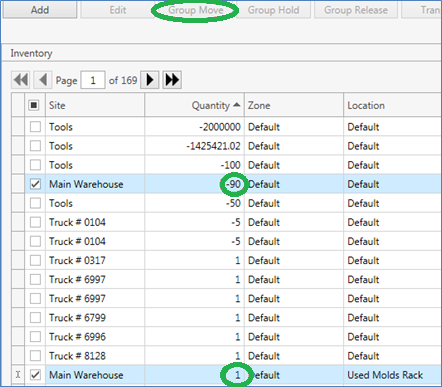
b. Remember that you can move stocks with one of the statuses: Available, On Hold, Allocated.
Group Hold
This operation holds the entire quantity of the selected stock group. The operation is also available in Location and LPN View Modes.
- Select stocks you are going to hold:
- checkmark
 records on the Inventory grid
 - or press Ctrl on keyboard and select records, one by one, by clicking on any place in a record line. Shift selection works too.
- checkmark
Hints:
- Stocks with negative quantity cannot be selected.
- Select only stocks in status Available.
Unlike in Group Move process, you can select stocks from different Sites.
Click Group Hold to see Hold Inventory window:
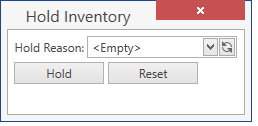
Optionally, select Hold Reason.
Confirm the operation by clicking Hold button.
- As a result, the stock status will be On Hold.
Group Release
This operation releases the entire reserved quantity of the selected stock group. The operation is also available in Location and LPN View Modes.
- Select On Hold stocks you are going to release:
- checkmark
 records on the Inventory grid
 - or press Ctrl on keyboard and select records, one by one, by clicking on any place in a record line. Shift selection works too.
- checkmark
- Click Group Release to see the following window:
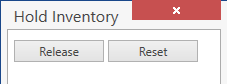
- Confirm the operation by clicking Release button.
- As a result, the stock status will be Available.
Transfer
This operation allows you to transfer one or multiple stocks from one site to another. The operation is also available in Location and LPN View Modes.
- Select Available stocks you are going to transfer:
- checkmark records on the Inventory grid
- or press Ctrl on keyboard and select records, one by one, by clicking on any place in a record line. Shift selection works too.
- checkmark

- Click Transfer. The following window opens:
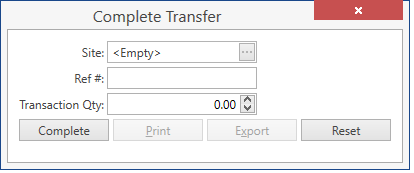
Transaction Quantity field is visible if transferring only one stock/LPN. You will not see it when transferring a group of stocks.
- Select Site you want to transfer stocks to.
- Specify Reference #: it will be recorded to Transaction History.
- After you have specified Site and Ref #, you can print and export the Transfer Order Detail document containing stock transfer information. Click Print or Export for that. Make sure to do this before transferring.
- If transferring only one stock/LPN, provide Transaction Quantity.
- If a stock has a serial number assigned, you should transfer the entire stock quantity.
- Transferring a part of the stock from LPN will result in taking it off the LPN and transferring the loose stock. The source LPN will stay where it was before the transfer.
- Click Complete button.
- Transferred stocks will have In Transit status awaiting to be received on the destination Site, unless Autoreceive option is enabled in System Settings.
Note. You can transfer the whole LPN as well. In this case LPN will be deleted from the source Site and created on the destination Site.
Receive
After stock(s)/LPN(s) have been transferred from Inventory screen or via Transfer Order, they can be received on the destination Site. The operation is also available in Location and LPN View Modes.
Note. Transferred stocks will be received automatically if Autoreceive option is enabled in System Settings. They will be put to Default Location of the Site specified.
- Select In Transit stocks you are going to receive:
- checkmark records on the Inventory grid
- or press Ctrl on keyboard and select records, one by one, by clicking on any place in a record line. Shift selection works too.
- checkmark
- Click Receive button. The following window opens:
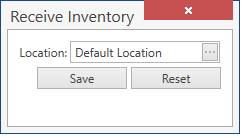
- Select Location you want to receive stocks to.
- Click Save button.
Print Labels
This is a common CoreIMS functionality. Refer to this section for details.
Inventory List Report
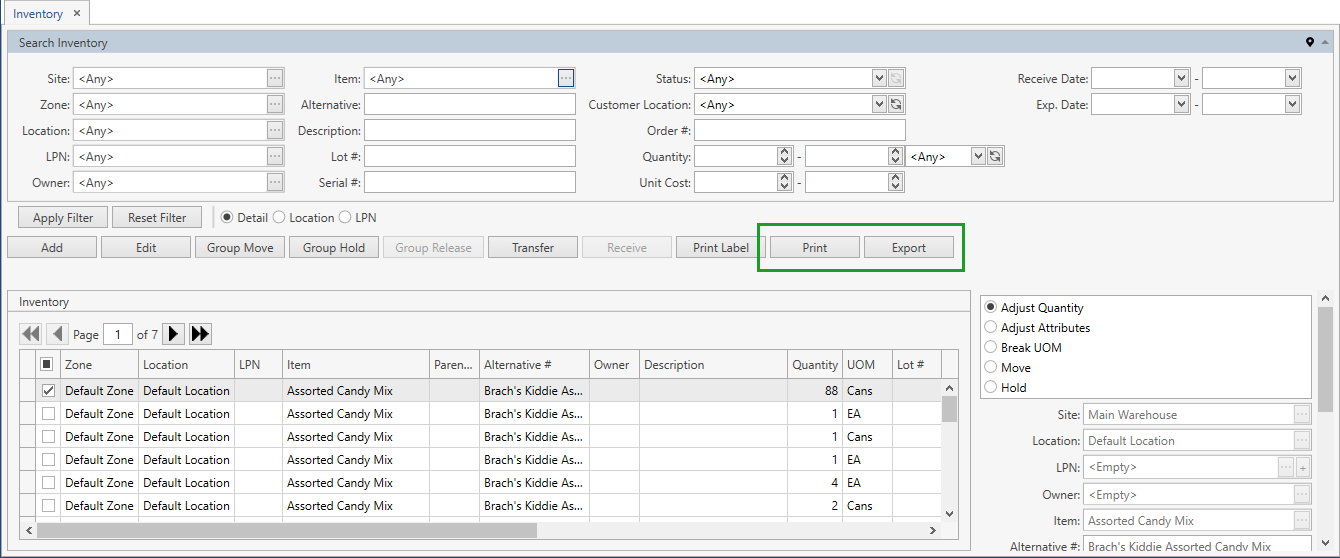
You can print or export Inventory List report displaying the data from the grid on Search Inventory screen. To this end use Print or Export button accordingly.
Clickable Link to Orders
When a stock has a reference to a Receiving, Shipping, Transfer or Work Order, the order number is displayed as a hyperlink on Inventory grid. Depending on the order type, the order number is reflected in one of the grid fields: Allocated To, Build WO Number, Receiving Order #. The latter will be visible if Track Receiving Order # option is enabled in System Settings.
Example for a stock associated with a Shipping Order:
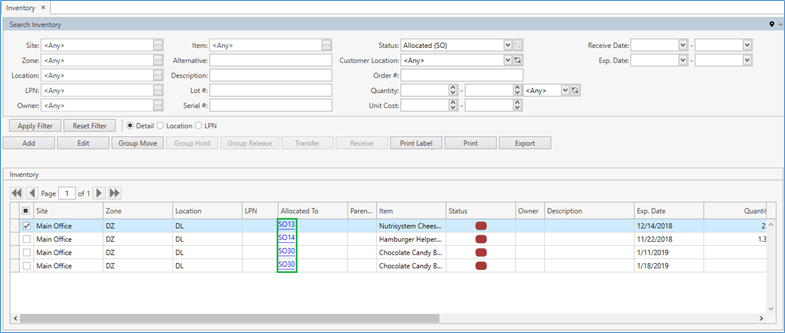
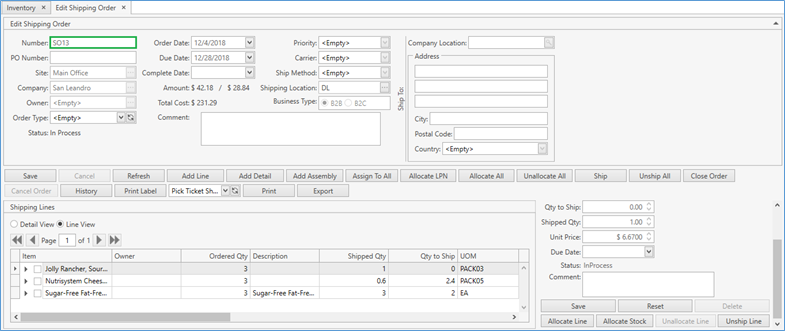
- Click on a highlighted link in Allocated To column:
- You will be redirected to the order the stock was allocated for:
Note. To access an order, one of the following permissions is required depending on the order type: View Receiving Orders, View Shipping Orders, View Transfer Orders, View Work Orders, View Manufacturing Orders.
Add LPN
An LPN can be added in the following processes: Add Stock, Move and Group Move operations.
When adding or moving a stock(s), click + button next to LPN field:
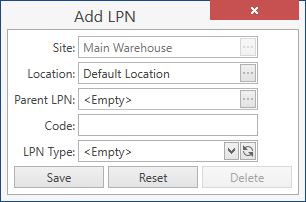
In Add LPN window, specify LPN attributes:
| Attribute | Required/Optional | Comment |
|---|---|---|
| Site | Required | Autopopulated with the Site if it is already specified for the stock – the field is non-editable in this case. |
| Location | Required | Autopopulated with the Location already specified for the stock, but you can select another one. |
| Parent LPN | Optional | Drop-down list of parent LPNs on the current Site and Location. |
| Code | Required | Shall be unique across the system. |
| LPN Type | Required | Drop-down list of the values defined in Configuration section. |
Click Save button to populate LPN field with Code. A new LPN will be created with the specified attributes.