Kitting Work Order
Required Permissions
- View Work Orders
- ability to search and access Kitting Work Orders in read-only mode
- Modify Work Orders
- ability to add, edit, cancel and close Kitting Work Orders
- Allocate Work Orders
- ability to allocate and unallocate stocks
- Assemble
- ability to build assemblies and sub-products
- Disassemble
- ability to unbuild assemblies
- View Reports
- ability to print and export Kitting Work Order Reports
- View Cost
- ability to view Amount in Kitting Work Orders
- ability to view Unit Cost of details in Kitting Work Orders
- Modify Cost
- ability to view Amount in Kitting Work Orders
- ability to view and edit Unit Cost of details in Kitting Work Orders
Overview
Kitting Work Orders are used in CoreIMS for assembling/disassembling items that have a predefined Bill of Materials, i.e. they are marked as Assembly in the system.
CoreIMS supports two types of Kitting Work Orders: Build and Unbuild.
Among others, Work Orders allow you to do the following:
- load a predefined Bill of Materials as assembly components;
- add new items as assembly components and/or remove/modify existing assembly components;
- produce any number of secondary products (sub-products) along with the main one (for Build Work Orders);
- perform a partial build/unbuild: if there is currently a lack of the inventory, it can be allocated partially and thus only part of the ordered quantity will be built/unbuilt. The remainder can be produced within next builds.
One Kitting Work Order is carried out within one site, so for a building/unbuilding procedure within one order you can use only those stocks that are available on this particular site.
Add Order
This is a unified instruction for Build and Unbuild Work Orders. When creating a Work Order, you will be required to define whether it's Build or Unbuild Order – just pay attention to Business Type field in the order header.
Go to Orders tab of the main menu.
Select Kitting Work Order -> Add Order menu item.

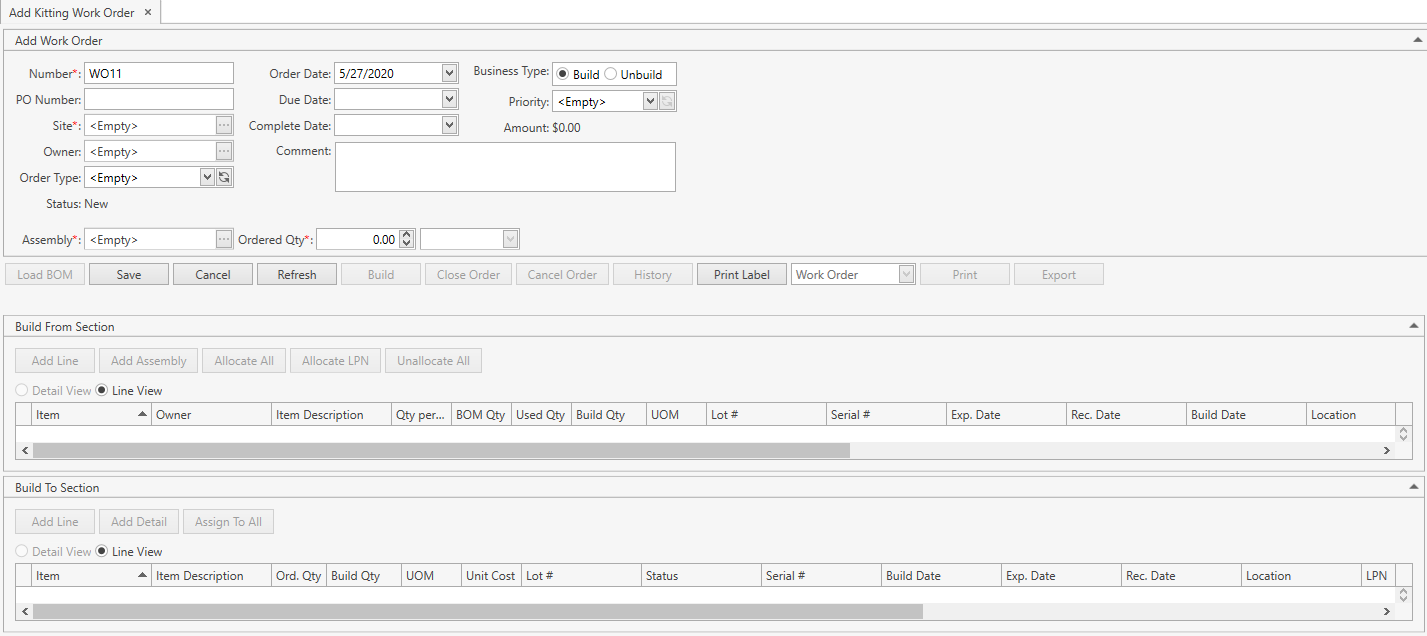
The following window will show up:
- Specify all the necessary attributes:
| Attribute | Required/Optional | Comment |
|---|---|---|
| Number | Required | Must be unique across the system; automatically prepopulated by CoreIMS if Autonumbering Setting for Work Order is turned on. |
| PO Number | Optional | |
| Site | Required | Drop-down list of active Sites that you have access to. The necessary Site can be searched by the ellipsis button [...] as well. CoreIMS automatically prepopulates the field, if you have a specified Default Site (please refer to Users section). |
| Owner | Optional | Drop-down list of active Companies marked as Owner. The necessary Company can be searched by the ellipsis button [...] as well. Visible only if Ownership mode is set up as Item Level or Stock Level in System Settings. If your CoreIMS has an assigned Owner (refer to Users section), you will be able to specify only this Owner or leave the Work Order without an owner assigned. |
| Order Type | Optional | Drop-down list of Order Types. |
| Status | Required | Non-editable; CoreIMS auto populates the field with one of the following values: New, In Process, Closed, Canceled. |
| Order Date | Required | CoreIMS prepopulates the field with the current date. You can change it, if necessary. |
| Due Date | Optional | |
| Complete Date | Optional | Non-editable; CoreIMS auto populates the field with the current date when the Work Order gets into Closed status. |
| Amount | Required | Non-editable; CoreIMS auto populates the field according to the following: Amount = Assembly Unit Cost Built Qty for Build Work Order Amount = Component Unit Cost Unbuilt Qty for Unbuild Work Order |
| Comment | Optional | |
| Business Type | Required | Build or Unbuild. |
| Priority | Optional | Drop-down list of the predefined system values: Rush, Low, Medium, High. |
| Custom Fields | Optional | If Work Order has any Active Custom Fields. |
| Assembly | Required | Drop-down list of active Assembly Items. You can also click [...] to search for the necessary item. |
| Ordered Qty: Qty + UOM | Required | You cannot enter the decimal quantity for serial-controlled items. |
Click Cancel button to reset the unsaved changes within the order header.
If you want to proceed with this new order, click Save button. The order will be saved in CoreIMS.
Build Work Order: a new In Progress line will be added to Build To Section. Line's detail will be in status New. By clicking on the line you can change Ordered Quantity and specify a comment.
Assembly Unit Cost can be also adjusted in the corresponding detail, unless Auto Calculate Assembly Cost option is enabled in System settings.Unbuild Work Order: a New line will be added to Unbuild From Section. Click on the line to change Ordered Quantity and specify a comment.
Now you can edit the order.
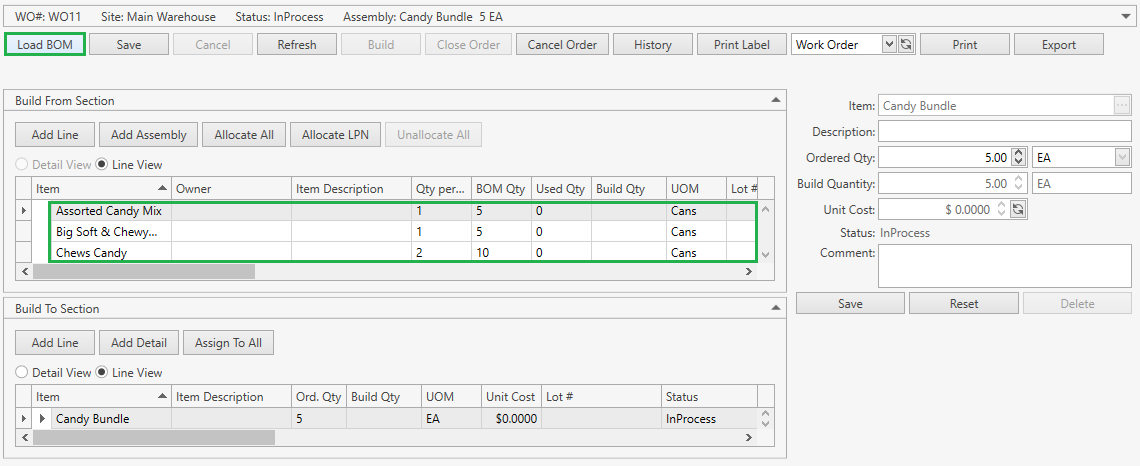
You can also save a new Build Work Order by clicking Load BOM. Just make sure all the required fields are populated:
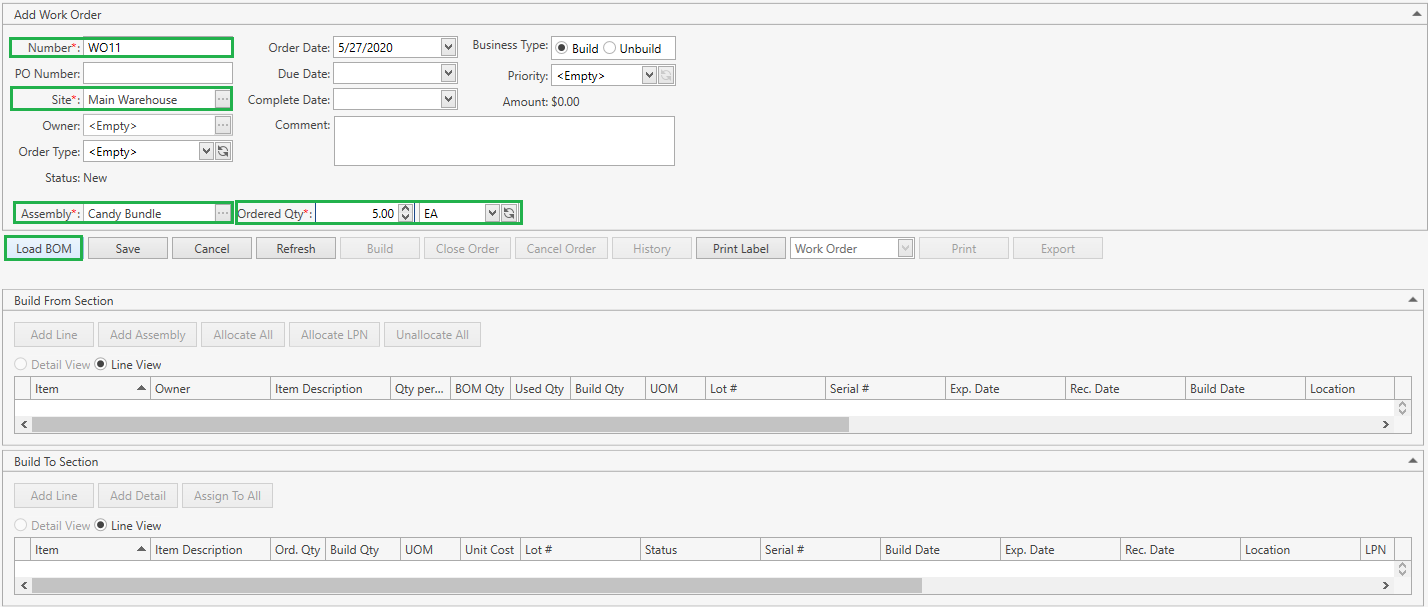
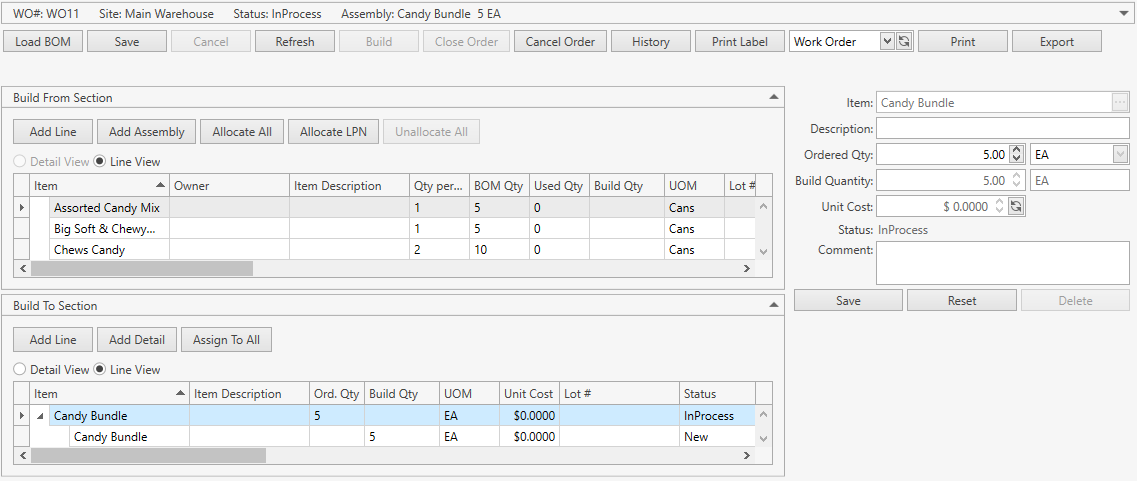
As the result:
- the order will be saved;
- the order header will be collapsed (please refer also to Orders: View Features section);
- Build From Section will be populated with assembly components. See Load BOM for details.
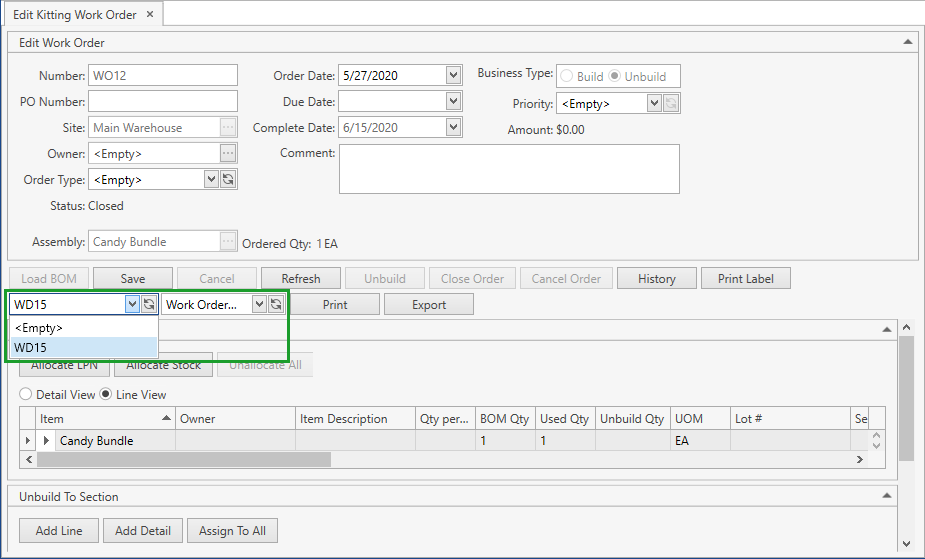
Edit Order
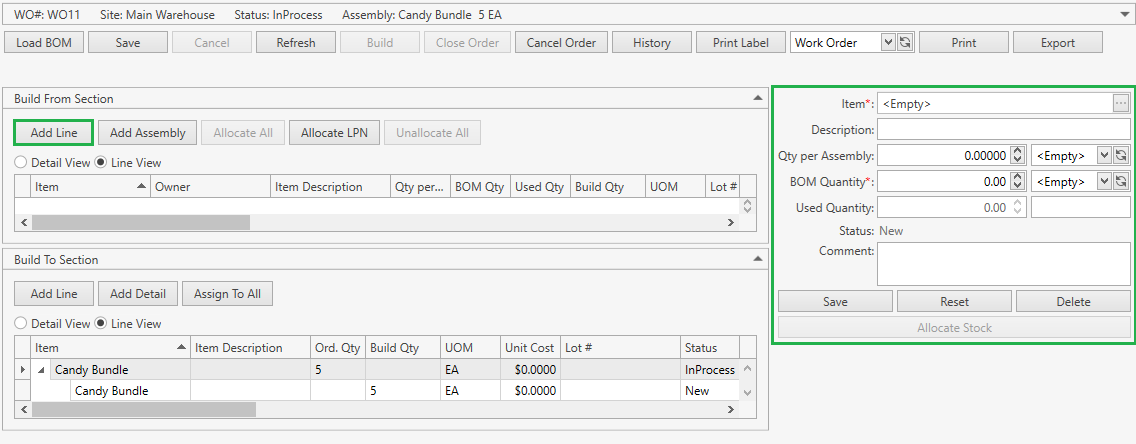
After saving the changes in Add Kitting Work Order tab, you will be redirected to Edit Kitting Work Order tab:
You can also get here from Search Work Order screen.
Also refer to Orders: View Features section for the details on different view parameters.
Edit all the necessary order attributes.
When done, click Save button to apply the changes made within the order header.
Click Cancel button to reset the unsaved changes within the order header.
Click Refresh button to reset the unsaved changes within the order header and update the displayed Work Order with the up-to-date values.
Click Close Order to close the order manually.
Here are more buttons in the order header:
Cancel Order: cancel the order.
History: view a list of the Work Order Documents associated with the current Work Order.
Print: view and print order reports.
- For Build Work Order operations, see the section below.
- For Unbuild Work Order operations, proceed to this section.
Build Work Order
Before building an assembly selected in the Order Header, you need to specify a list of components to build it from. This can be done in one of the following ways:
- add components one by one in Build From Section;
- add another assembly as a component;
- add components from a Bill of Materials – a list of predefined components for the selected assembly. Note that BOM is configured in Item section.
Then you will need to allocate components in Build From Section. Use the following buttons for this:
After this review the Build To Section lines. Normally there will be a line with an assembly to build, but you can add sub-products here:
Finally, click Build button to produce the assembly from the allocated components.
When working with the order, you can also Print Labels, view Order History and produce Work Order Reports.
Add Component
Here you can define components to build an assembly from and also add up services (service items).
- Navigate to Build From Section.
- Click Add Line to see following window:
- Specify line attributes according to the following:
| Attribute | Required/Optional | Comment |
|---|---|---|
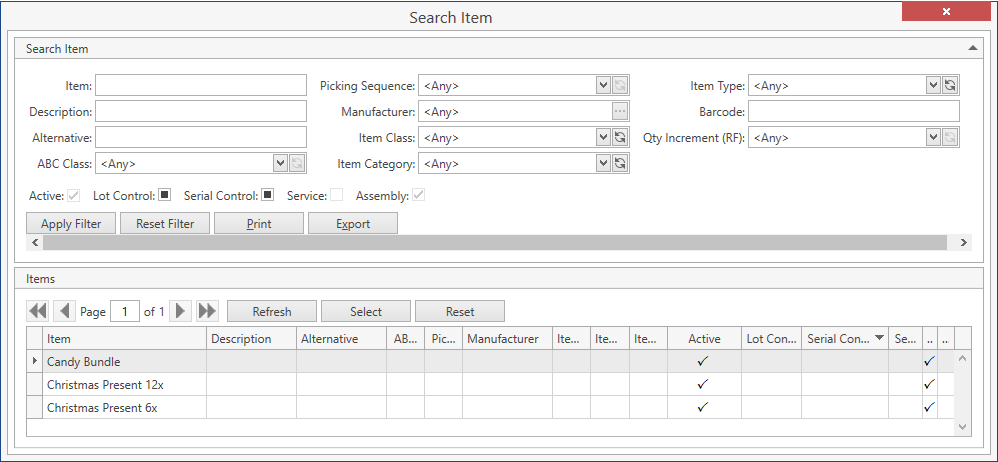
| Item | Required | Drop-down list of active items. The necessary item can be searched by the ellipsis button [...] as well. For Item Level Ownership: if your User has an Owner assigned (refer to Users section) or you selected an Owner in the order header, you will be able to select an item only of this Owner or without an owner. |
| Description | Optional | Non-editable; CoreIMS auto populates the field if the respective item has the specified description. |
| Qty per Assembly: Qty + UOM | Required | You cannot enter the decimal quantity for serial-controlled items. |
| BOM Quantity | Required | Calculated automatically according to the build quantity of Build To section and the defined Quantity per Assembly. |
| Used Quantity | Required | Non-editable; CoreIMS auto populates the field according to quantities and statuses of the line's details. |
| Status | Required | Non-editable; CoreIMS auto populates the field with one of the following values: New, In Process, Closed. |
| Comment | Optional |
- Click Reset button if you want to cancel adding of an order line.
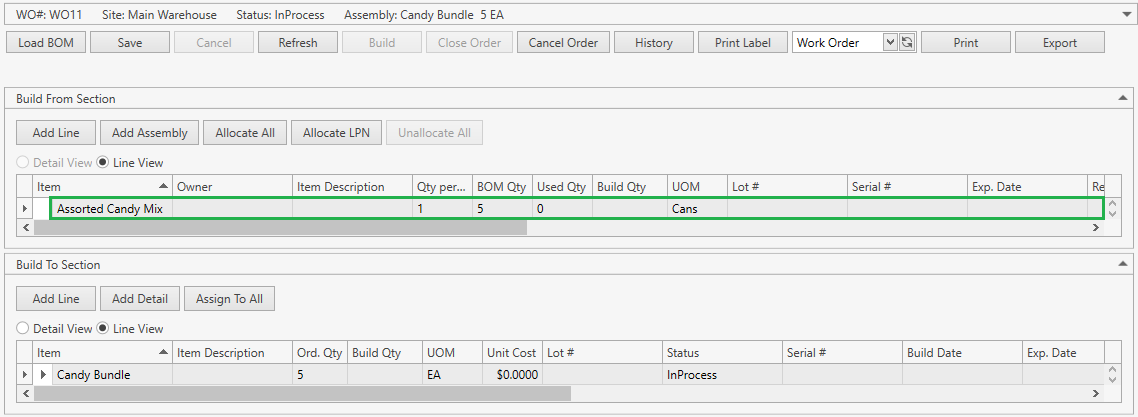
- Click Save button to add the component line in New status to the order:
Add Assembly
This allows you to make an assembly or its components a part of your build.
- Navigate to Build From Section.
- Click Add Assembly.
- Select an assembly:
- Define how many to add:
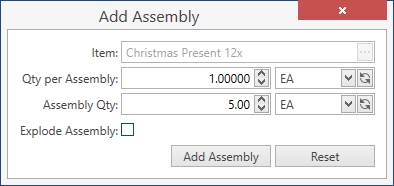
CoreIMS calculates Assembly Quantity automatically according to Quantity per Assembly and build quantity of Build To section.
Enable Explode Assembly option if you want assembly's components to be added, instead of the assembly itself.
- Click Add Assembly. Check up Build From Section for new lines.
Load BOM
On the order control panel, click Load BOM button to see the confirmation message:

If confirmed, CoreIMS populates Build From Section lines with assembly's components and details according to its Bill of Material.
Edit Component
Click on a line in Build From Section:
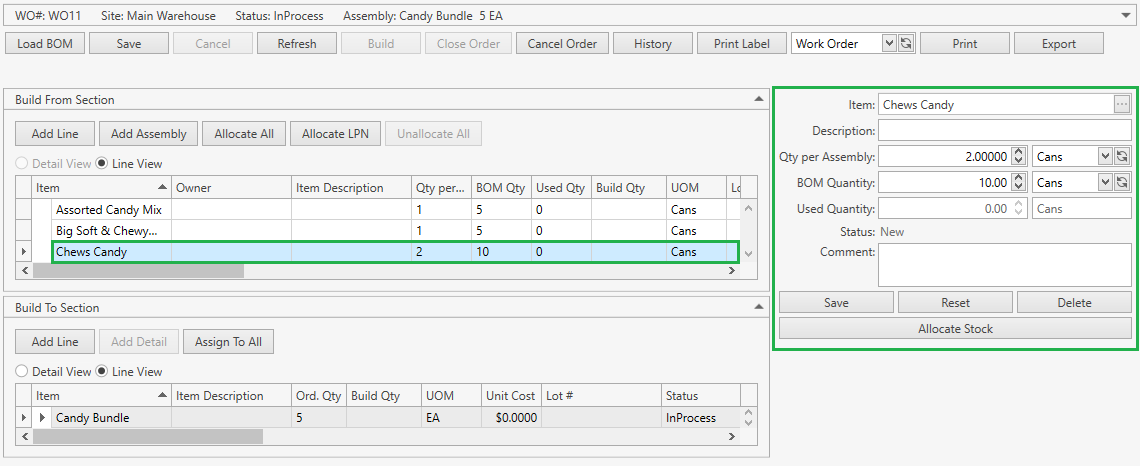
- Replace the component with another one or adjust Qty per Assembly,
- Click Save button.
Some other operations here:
- Delete – click to delete the component line in status New,
- This cannot be done if a line has details.
- Allocate Stock.
Troubleshooting
- Quantity of Work Order Line cannot be modified.
Make sure that line is in status New. Perhaps the component has already been allocated – unallocate it and make the required changes.
Allocate Component
After you've added components to Build From Section, it's required to allocate component stock from Inventory. The following operations are available:
- Allocate All – allocate the entire list of components
- Unallocate All – release all the allocated components
You can also allocate lines one by one:
There's a way to Allocate LPN – use the corresponding button in Build From Section.
These operations trigger the stock allocation which is reflected in CoreIMS Transaction History.
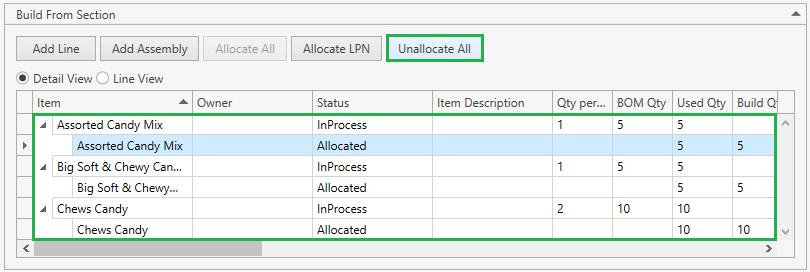
Allocate All
- Navigate to Build From Section.
- Click Allocate All.
CoreIMS will attempt to automatically allocate components:
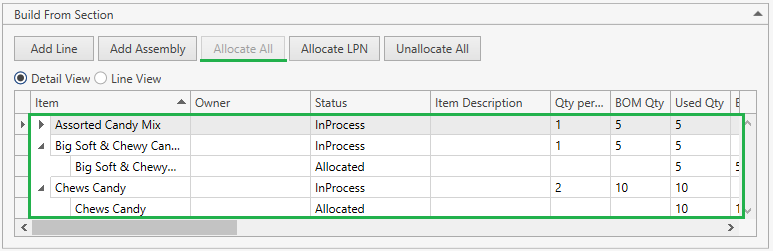
If successful – and stock is on hand – components are allocated and lines are supplemented with details in status Allocated.
For info on Allocate All algorithm, refer to this section.
Allocate Stock
- Navigate to Build From Section.
- Select a line and click Allocate Stock:

This is a common allocation functionality – refer to this page for more info.
- The Inventory window pops up. Highlight stock to allocate and pick quantity according to Qty to Allocate. Then click Select:
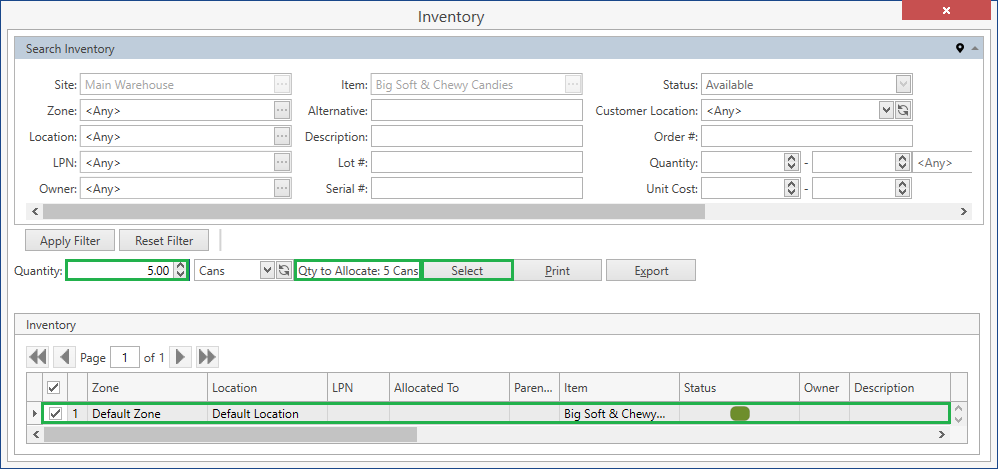
You can pick more than required in Build From line. CoreIMS can allocate all the available quantity, so pay attention to numbers.
As a result, a new Allocated detail will be added to the selected line if the required stock had been allocated:
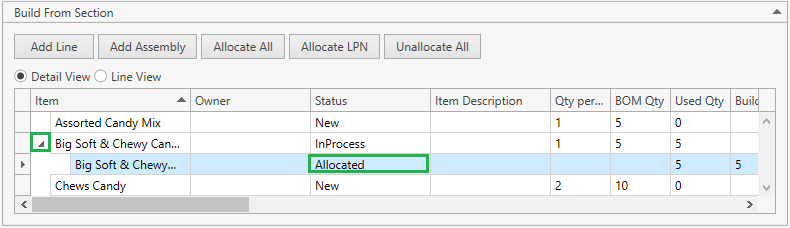
The line itself will have status In Process.
Allocate LPN
You can allocate an LPN (without even adding preliminary respective order lines) by clicking Allocate LPN button. This is a common functionality for orders. Refer to Allocate LPN section for details.
Unallocate Components
Should you need to replace components or make changes in lines, you can always release all the allocated components before building:
- Just click Unallocate All:
This will release previously allocated stock(s) and remove line detail(s):

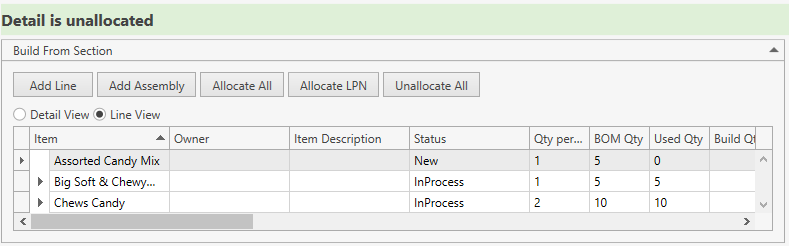
- Or select a detail and click Unallocate:
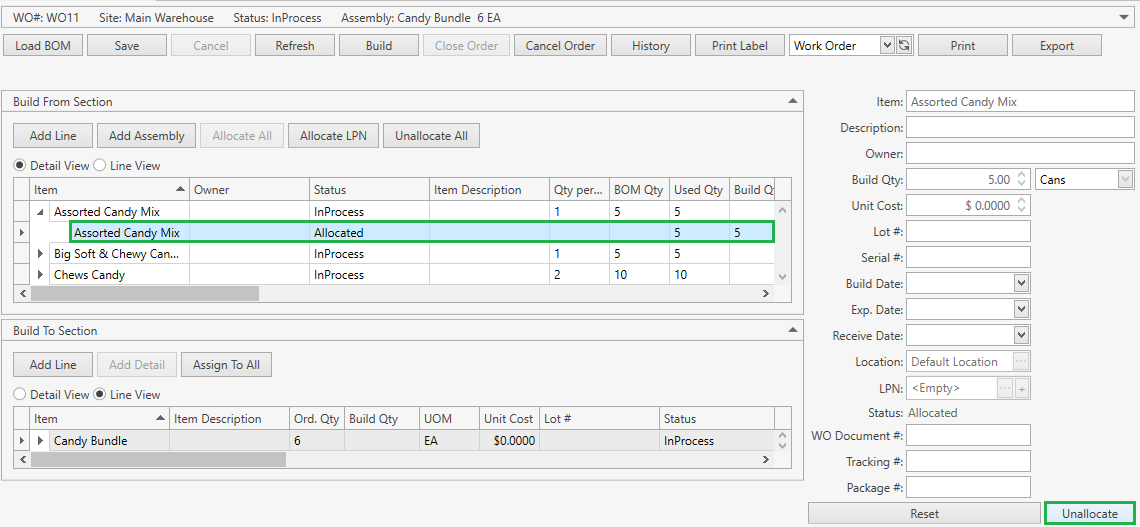
Allocated stock will be released and the detail will be removed as well:
Add Sub-Product
Normally Build To Section is automatically populated by CoreIMS with the selected assembly to build.
You can change Ordered Quantity in the assembly line, but the item itself cannot be replaced – it's predefined in the order header as Assembly field value.
But you can add more items here – they will be produced along with the assembly selected in the order header as so called sub-products.
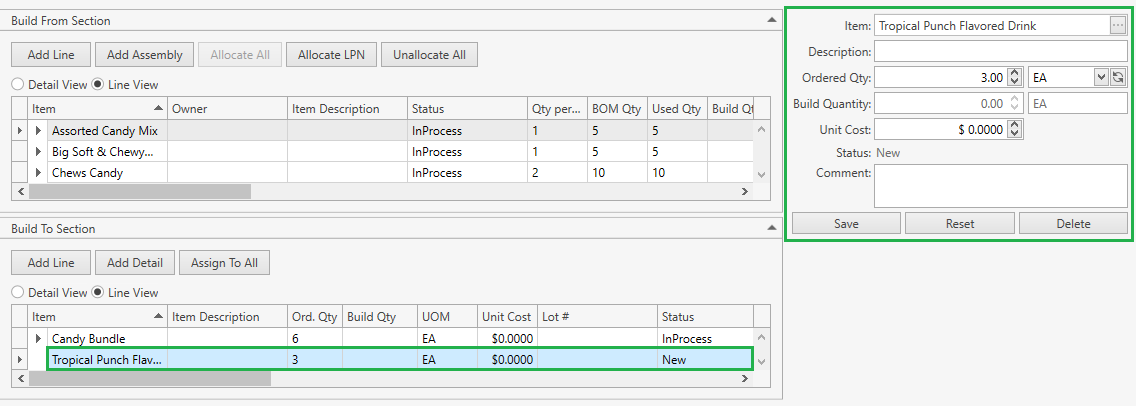
- In Build To Section click Add Line:
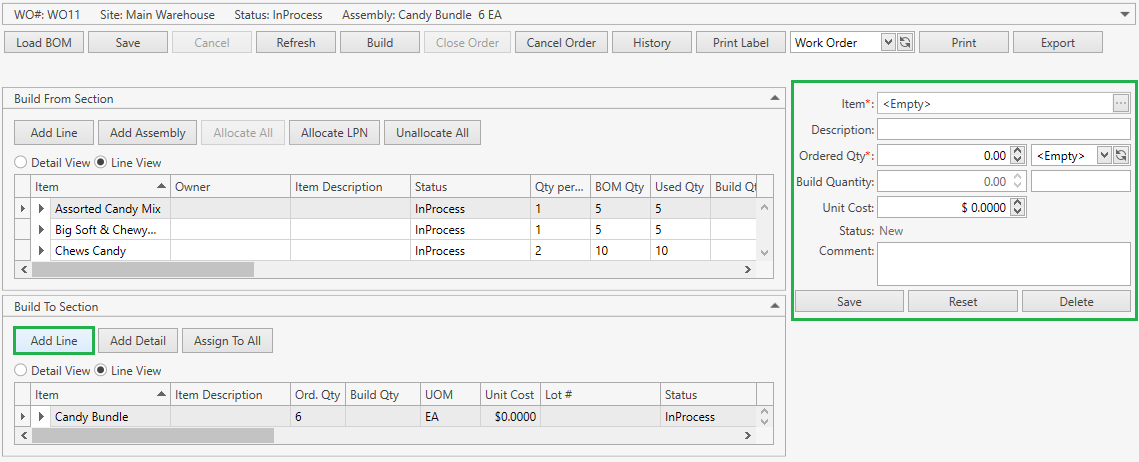
- Specify line attributes according to the following:
| Attribute | Required/Optional | Comment |
|---|---|---|
| Item | Required | Drop-down list of active items. The necessary item can be searched by the ellipsis button [...] as well. If Ownership mode is set up as Item Level: if your User has an Owner (refer to Users section) and/or you selected an Owner in the order header, you will be able to select an item only of this Owner or without an owner. |
| Description | Optional | Non-editable; CoreIMS auto populates the field if the respective item has the specified description. |
| Ordered Qty + UOM | Required | You cannot enter the decimal quantity for serial-controlled items. |
| Build Quantity | Required | Autopopulated as sum value from line details. |
| Unit Cost | Optional | CoreIMS auto populates the field if Unit Cost is specified for the respective UOM in Item UOMs tab. |
| Status | Required | Non-editable; CoreIMS auto populates the field with one of the following values: New, In Process, Closed. |
| Comment | Optional |
- Click Reset button if you want to cancel adding of an order line.
- Click Save button to finish adding the sub-product line to Build To section:
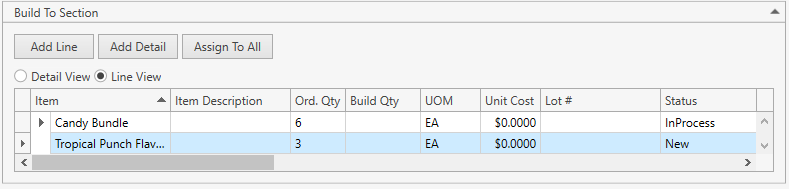
When doing this in a closed order, the order will be reopened and set to In Progress status.
Add Detail
After adding a new sub-product, you can specify stock attributes to be assigned to this sub-product upon building the order.
- Navigate to Build To Section.
- Select a line.
- Click Add Detail button. The following window will show up:
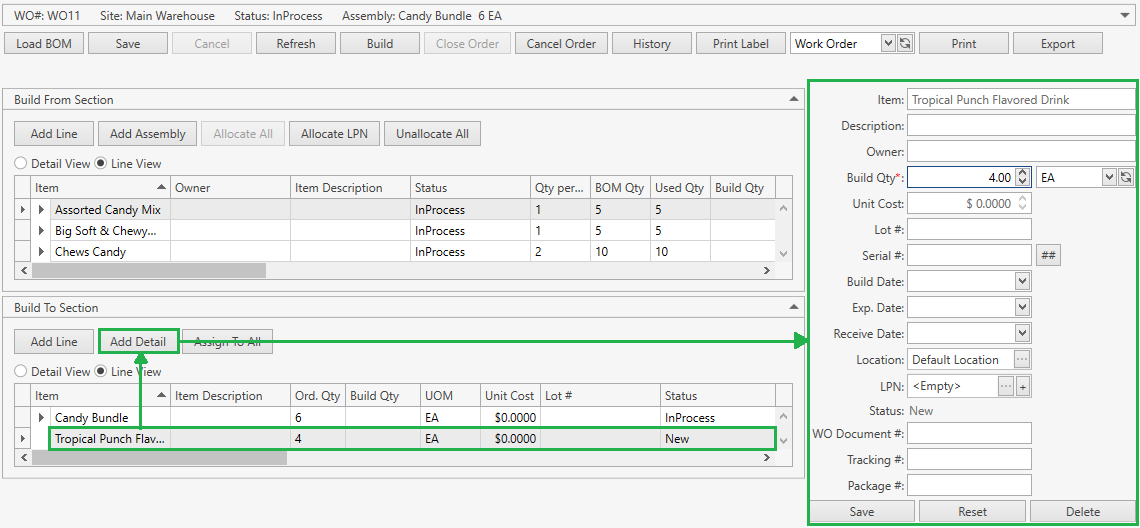
- Specify the detail attributes according to the following:
| Attribute | Required/Optional | Comment |
|---|---|---|
| Item | Required | Non-editable; CoreIMS auto populates the field with the respective item from the order line. |
| Description | Optional | Non-editable; CoreIMS auto populates the field if the respective item has a description. |
| Owner | Optional | If Ownership mode is set up as No: non-visible. If Ownership mode is set up as Item Level: non-editable; CoreIMS auto populates the field with Owner of the respective item from the order line. If Ownership mode is set up as Stock Level: a drop-down list of active Companies marked as Owner. The necessary Company can be searched by the ellipsis button [...] as well. If your CoreIMS user has an assigned Owner (refer to Users section) and/or you indicated Owner in the order header, you will be able to specify only this Owner or leave the detail without an owner. |
| Build Qty | Required | For non-serial controlled items: CoreIMS prepopulates UOM field with the respective UOM from the order line. For serial-controlled items: CoreIMS prepopulates UOM field with the base UOM of Quantity UOM Class specified for the respective item. Qty is 1 by default and non-editable for you; CoreIMS automatically populates this field according to the quantity of serial numbers. |
| Unit Cost | Optional | CoreIMS prepopulates the field if Unit Cost is specified for the respective UOM in Item UOMs tab. |
| Lot # | Required* | *If the item is lot-controlled. |
| Serial # | Required* | *If the item is serial-controlled. If Autonumbering Setting for Serial Number is turned on, you can generate Serial # for non-serial controlled items by clicking on  button near Serial # field. Please refer to this section to view how to assign serial numbers for serial-controlled items. button near Serial # field. Please refer to this section to view how to assign serial numbers for serial-controlled items. |
| Build Date | Optional | Non-editable; CoreIMS auto populates the field once the detail was built. |
| Exp. Date | Required* | *If FEFO picking sequence is supported for the respective item. |
| Receive Date | Required* | *If FIFO or LIFO picking sequence is supported for the respective item. |
| Location | Required | CoreIMS prepopulates the field with the item Preferred Location if it is specified for the Site from the order header. Otherwise, CoreIMS populates this field with Default Location specified for the order header Site. |
| LPN | Optional | Drop-down list of LPNs located on the Site from the order header. The necessary LPN can be searched by the ellipsis button [...] as well. You can also add a new LPN. |
| Status | Required | Non-editable; CoreIMS auto populates the field with one of the following values: New, Built. |
| WO Document # | Optional | Non-editable; CoreIMS auto populates the field once the detail was built with the respective number of Work Order Document. |
| Tracking # | Optional | Non-editable; CoreIMS auto populates the field (only for Shipping Orders) during the integration with the external carrier system (UPS) if Track Package is turned on in System Settings. |
| Package # | Optional | Non-editable; CoreIMS auto populates the field (only for Shipping Orders) during the integration with the external carrier system (UPS) if Track Package is turned on in System Settings. |
| Custom Fields | Optional | If Stock has any Active Custom Fields. |
- Click Reset button if you want to cancel adding of a new order detail.
- Click Save button to add a detail in New status to the selected line:
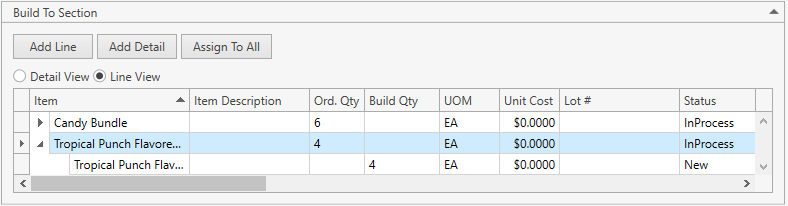
Note: you can click on a detail, view and change its attributes (see table above).
Assign To All
This is a common functionality. Consult this page for instructions.
Edit Sub-Product
- Locate Build To Section.
- Select a line:
- If needed, replace the sub-product with another one.
- Make sure the sub-product has no details. Otherwise, the item selector will not be available for changes.
- Or adjust Ordered Qty.
- Provide an optional comment.
- Click Save button.
- You can also remove the line by clicking Delete button.
Troubleshooting
- Quantity of the Work Order Line cannot be modified.
Ordered Quantity of the line cannot be less than Build Quantity. Define new Ordered Quantity.
Build
When Build From and Build To sections are prepared as instructed above, you can proceed with build operation.
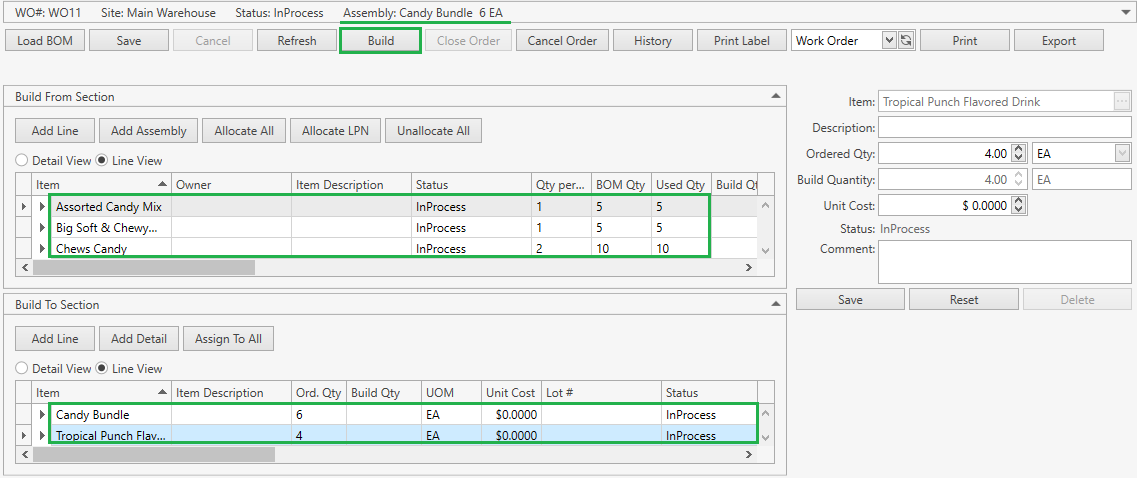
When only a part of BOM Qty was allocated for components (e.g. 10 Chews Candy units were expected, but only 5 allocated), CoreIMS will conduct Partial Build operation – the order will stay in status In Process until you allocate enough components which will allow you to build the rest of assemblies, or manually close the order.
Click Build:
Specify all the necessary info in the form:

Select Build Mode:
- New Document: CoreIMS will generate a new Work Order Document; you need to specify Document # – CoreIMS prepopulates Document # if Autonumbering Setting for Work Order Document is turned on.
- Continue Document: CoreIMS will record the result of the build operation into one of the Work Order Documents generated during the previous build operations within the current Kitting Work Order.
Change Build Date, if needed. By default the date is set to the current date.
Click Reset button to cancel the operation.
Click Build button to confirm the operation.
As the result:
- Actually built assembly and sub-products are added to Site Inventory.
- Components are written off from the Site.
- In case of partial build, the order will stay in status In Process. Allocate more components and build again.
- In case of full build, the order and its lines will be closed down.
- Transaction History is updated with the operation records.
Unbuild Work Order
CoreIMS enables you to unbuild assemblies. The workflow is the following:
- Create new or open up an existing Kitting Work Order, select Business Type – Unbuild.
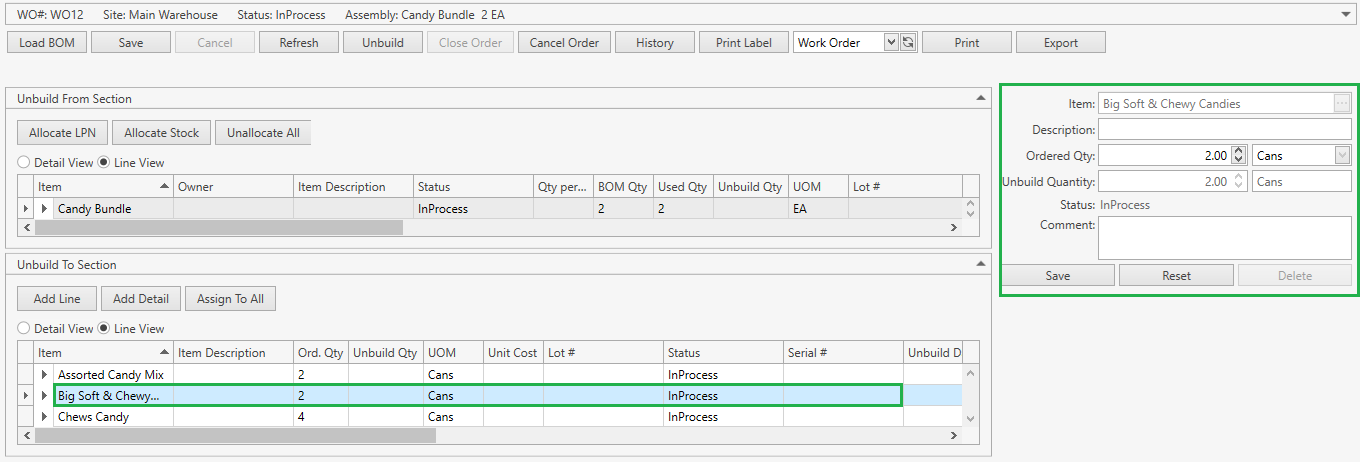
- In Unbuild From Section review the line with selected assembly. You can click on the line and change Ordered Qty if needed and provide an optional comment.
- Then allocate assembly. There are a couple of options:
- List the assembly components in Unbuild To Section in one of the following ways:
- add components one by one in Unbuild To Section;
- add components from a Bill of Materials – a list of predefined components for the selected assembly. Note that BOM is configured in Item section.
- Unbuild the assembly.
When working with the order, you can also Print Labels, view Order History and produce Work Order Reports.
Allocate Assembly
After you've saved the Unbuild Order, the selected assembly will be added to Unbuild From Section as an order line. Now you need to allocate it:
- Click Allocate Stock;
- Or use Allocate LPN button. Note that you can allocate stocks only of the item being unbuilt.

Allocations are reflected in CoreIMS Transaction History.
When an assembly has been allocated, CoreIMS will add a line detail:

There may be multiple details if you're allocating stocks of serial-controlled items or stocks with different attributes.
Now that we have allocated an assembly to unbuild, let's define a list of components that will be added to the inventory upon unbuild operation.
Unallocate
You can release the allocated assembly before the unbuild operation:
- Just click Unallocate All:

This will release previously allocated stock(s) and remove line detail(s):

- Or select a detail and click Unallocate:
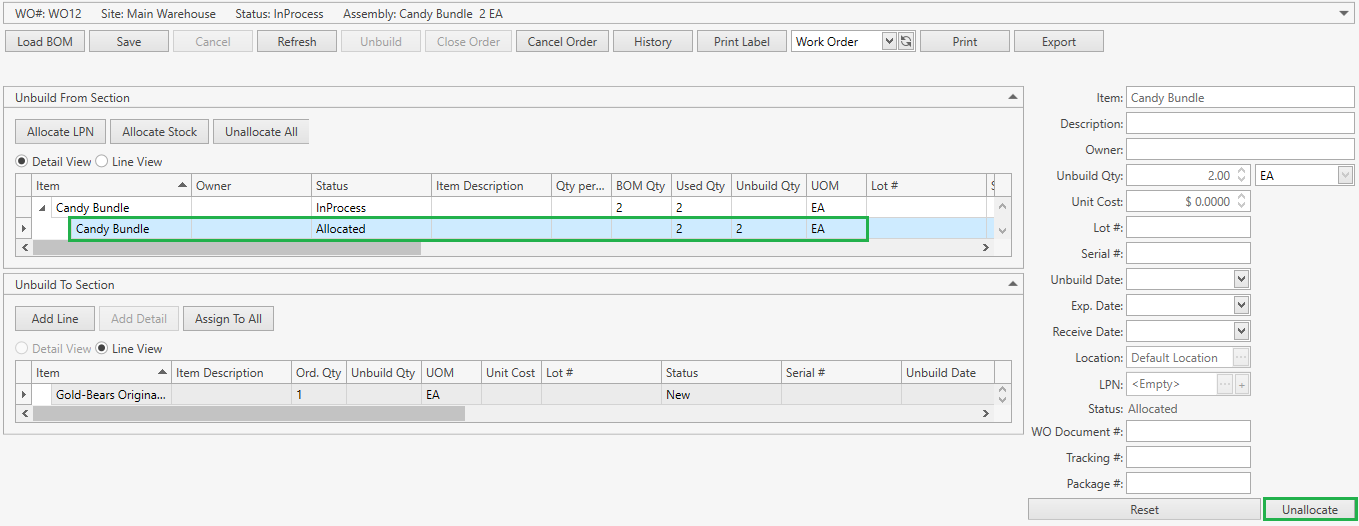
Allocated stock will be released and the detail will be removed as well.
Add Component
Here you can define components the assembly consists of – they will be added to the inventory upon unbuild operation.
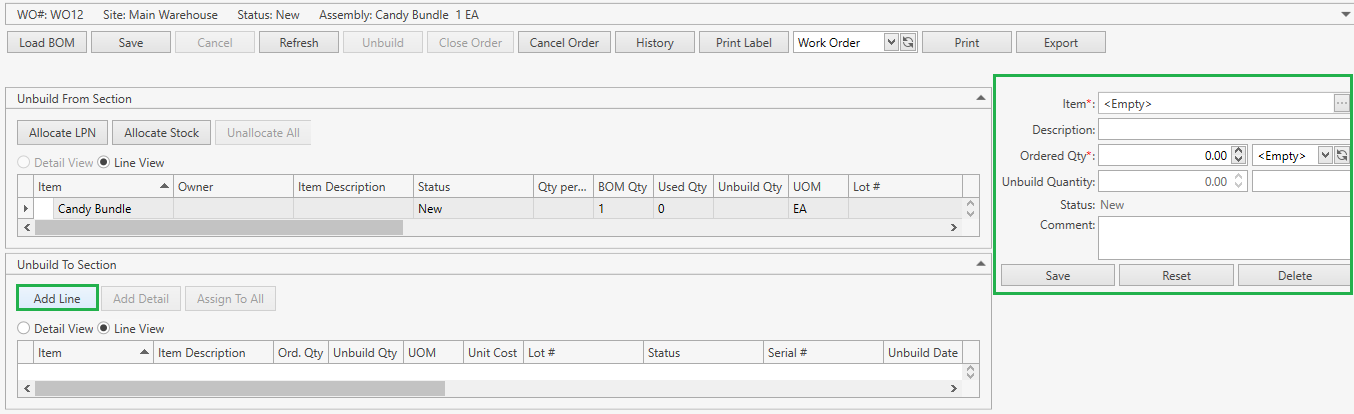
- Navigate to Unbuild To Section,
- Click Add Line to see the following window:
- Specify line attributes according to the following:
| Attribute | Required/Optional | Comment |
|---|---|---|
| Item | Required | Drop-down list of active items. The necessary item can be searched by the ellipsis button [...] as well. For Item Level Ownership: if an Owner is specified in your User settings or you selected an Owner in the order header, you will be able to select an item only of this Owner or without an owner. |
| Description | Optional | Non-editable; CoreIMS auto populates the field if the respective item has the specified description. |
| Ordered Qty: Qty + UOM | Required | You cannot enter the decimal quantity for serial-controlled items. |
| Unbuild Quantity | Required | Non-editable; CoreIMS auto populates the field according to quantities and statuses of the line's details. |
| Status | Required | Non-editable; CoreIMS auto populates the field with one of the following values: New, In Process, Closed. |
| Comment | Optional |
- Click Reset button if you want to cancel adding of a new line.
- Click Save button to add a component line in New status to the order:
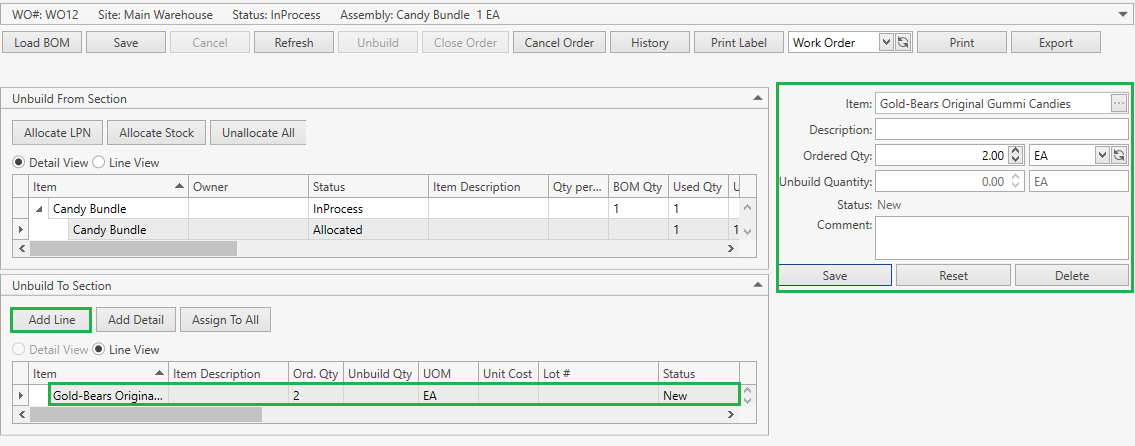
Note: you can click on a component line and view its attributes, change Ordered Quantity and provide an optional comment.
Add Detail
After adding an assembly component, you can specify stock attributes to be assigned to component upon the order unbuild.
- Navigate to Unbuild To Section.
- Select a line.
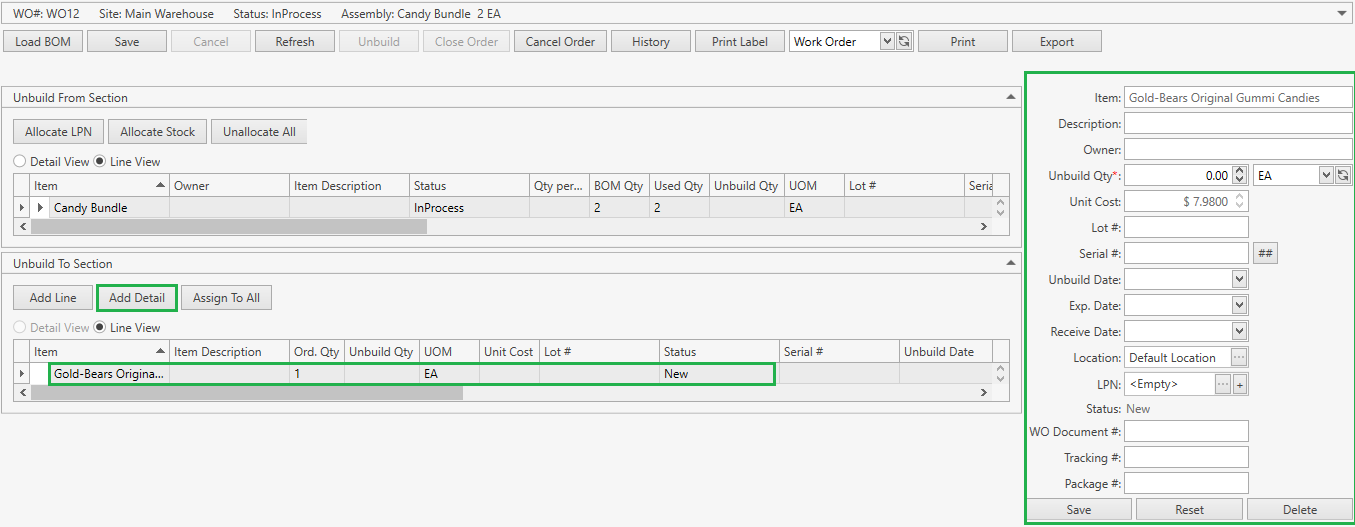
- Click Add Detail button. The following window will show up:
- Specify the detail attributes according to the following:
| Attribute | Required/Optional | Comment |
|---|---|---|
| Item | Required | Non-editable; CoreIMS auto populates the field with the respective item from the order line. |
| Description | Optional | Non-editable; CoreIMS auto populates the field if the respective item has a description. |
| Owner | Optional | If Ownership mode is set up as No: non-visible. If Ownership mode is set up as Item Level: non-editable; CoreIMS auto populates the field with Owner of the respective item from the order line. If Ownership mode is set up as Stock Level: a drop-down list of active Companies marked as Owner. The necessary Company can be searched by the ellipsis button [...] as well. If your CoreIMS user has an assigned Owner (refer to Users section) and/or you indicated Owner in the order header, you will be able to specify only this Owner or leave the detail without an owner. |
| Unbuild Qty | Required | For non-serial controlled items: CoreIMS prepopulates UOM field with the respective UOM from the order line. For serial-controlled items: CoreIMS prepopulates UOM field with the base UOM of Quantity UOM Class specified for the respective item. Qty is 1 by default and non-editable for you; CoreIMS automatically populates this field according to the quantity of serial numbers. |
| Unit Cost | Optional | CoreIMS prepopulates the field if Unit Cost is specified for the respective UOM in Item UOMs tab. |
| Lot # | Required* | *If the item is lot-controlled. |
| Serial # | Required* | *If the item is serial-controlled. If Autonumbering Setting for Serial Number is turned on, you can generate Serial # for non-serial controlled items by clicking on button near Serial # field. Please refer to this section to view how to assign serial numbers for serial-controlled items. |
| Unbuild Date | Optional | Non-editable; CoreIMS auto populates the field once the detail was unbuilt. |
| Exp. Date | Required* | *If FEFO picking sequence is supported for the respective item. |
| Receive Date | Required* | *If FIFO or LIFO picking sequence is supported for the respective item. |
| Location | Required | CoreIMS prepopulates the field with the item Preferred Location if it is specified for the Site from the order header. Otherwise, CoreIMS populates this field with Default Location specified for the order header Site. |
| LPN | Optional | Drop-down list of LPNs located on the Site from the order header. The necessary LPN can be searched by the ellipsis button [...] as well. You can also add a new LPN. |
| Status | Required | Non-editable; CoreIMS auto populates the field with one of the following values: New, Unbuilt. |
| WO Document # | Optional | Non-editable; CoreIMS auto populates the field once the detail was unbuilt with the respective number of Work Order Document. |
| Tracking # | Optional | Non-editable; CoreIMS auto populates the field (only for Shipping Orders) during the integration with the external carrier system (UPS) if Track Package is turned on in System Settings. |
| Package # | Optional | Non-editable; CoreIMS auto populates the field (only for Shipping Orders) during the integration with the external carrier system (UPS) if Track Package is turned on in System Settings. |
| Custom Fields | Optional | If Stock has any Active Custom Fields. |
- Click Reset button if you want to cancel adding of a new order detail.
- Click Save button to add a detail in New status to the selected line:

Note: you can click on a detail, view and change its attributes (see table above).
Assign To All
This is a common functionality. Consult this page for instructions.
Load BOM
If the allocated assembly has a reference to a Build Work Order, this function will load a list of components from it. Otherwise, the assembly's Bill of Material will be used as a source of a component list.
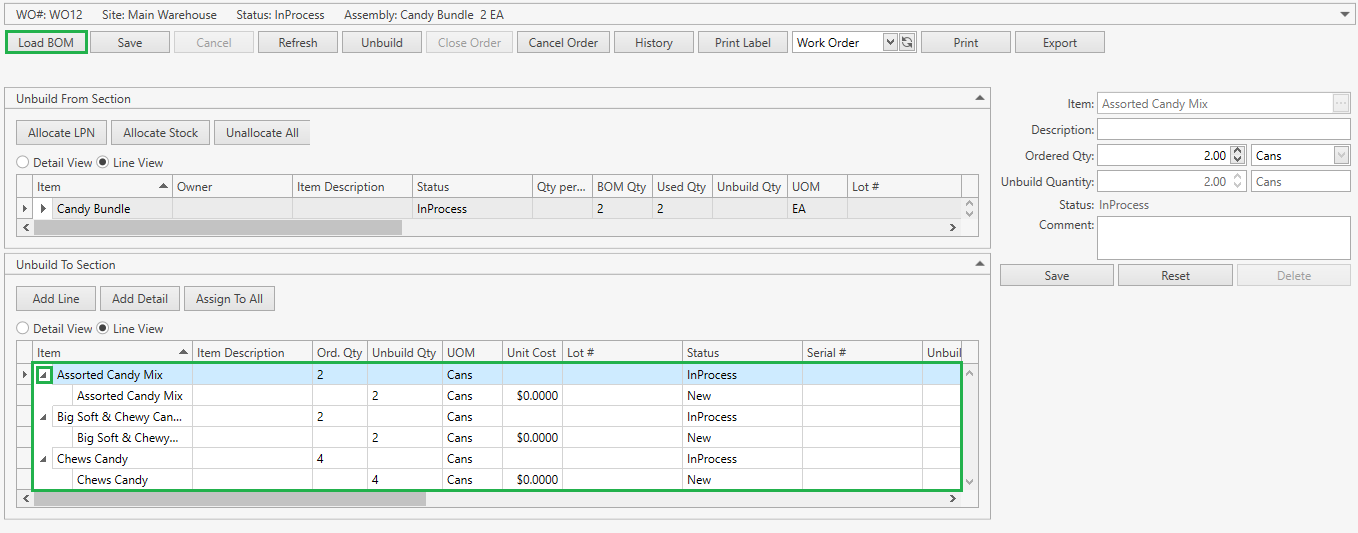
On the order control panel, click Load BOM button to see the confirmation message:
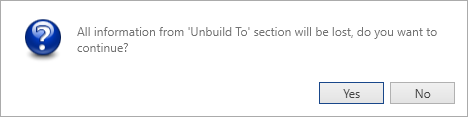
If confirmed, CoreIMS populates Unbuild To Section lines with assembly's components and details:
Edit Component
- Locate Unbuild To Section.
- Select a line:
- If needed, replace the component with another one.
- Or adjust Ordered Qty.
- Provide an optional comment.
- Click Save button.
You can also delete component if a line has no details.
Unbuild
When Unbuild From and Unbuild To sections are prepared as instructed above, you can proceed with the unbuild operation.
When only a part of BOM Qty was allocated for assembly (e.g. 10 units were expected, but only 5 allocated), CoreIMS will conduct Partial Unbuild operation – the order will stay in status In Process until you allocate enough assembly stocks which will allow you to unbuild the rest of them, or manually close the order.
- Click Unbuild:

Select Unbuild Mode:
- New Document: CoreIMS will generate a new Work Order Document; you need to specify Document # – CoreIMS prepopulates Document # if Autonumbering Setting for Work Order Document is turned on.
- Continue Document: CoreIMS will record the result of the unbuild operation into one of the Work Order Documents generated during the previous unbuild operations within the current Kitting Work Order.
Change Unbuild Date, if needed. By default the date is set to the current date.
Click Reset button to cancel the operation.
Click Unbuild button to confirm the operation.
As the result:
- Assembly has been unbuilt and written off from the Site.
- Assembly components are added to Site Inventory.
- In case of partial unbuild, the order stays in status In Process.
- In case of full unbuild, the order and its lines are closed down.
- Transaction History is updated with the operation records.
Order Operations
Cancel Order
- Click Cancel Order button.
- Confirm the operation:
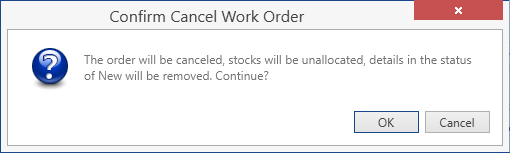
Once you confirm the operation, CoreIMS will do the following:
- Set Ordered Qty = 0.
- Delete details in status New.
- Unallocate stocks.
- Assign to lines the status Closed.
- Assign to the order the status Canceled.
Even if the order was canceled, it is still available in CoreIMS and you can search, view and edit it.
Close Order
- Click Close Order button.
- Confirm the operation:

Once you confirm the operation, CoreIMS will do the following:
- Unallocate stocks.
- Set BOM Qty = Used Qty.
- Delete details in status New.
- Set Ordered Qty = Built Qty.
- Update Total Cost in the order header.
- Assign to lines the status Closed.
- Assign to the order the status Closed.
Order History
Use History button to access Work Order Documents generated for a Kitting Work Order:
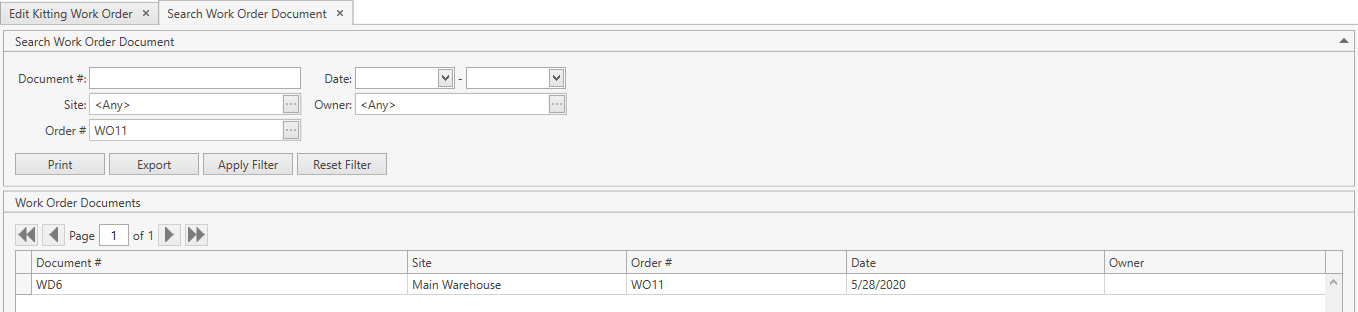
CoreIMS prepopulates Site and Order # fields and makes them disabled as you're accessing Search Work Order Document window through the specific Work Order. This means that you will be able to see Work Order Documents only of this order.
Refer to Search Work Order Document section to view the operations you can perform from Search Work Order Document screen.
Print Label
This is a common CoreIMS functionality. Refer to this section for details.
Work Order Reports
You can print or export Work Order reports. These reports are available from the drop-down list in the order control panel:
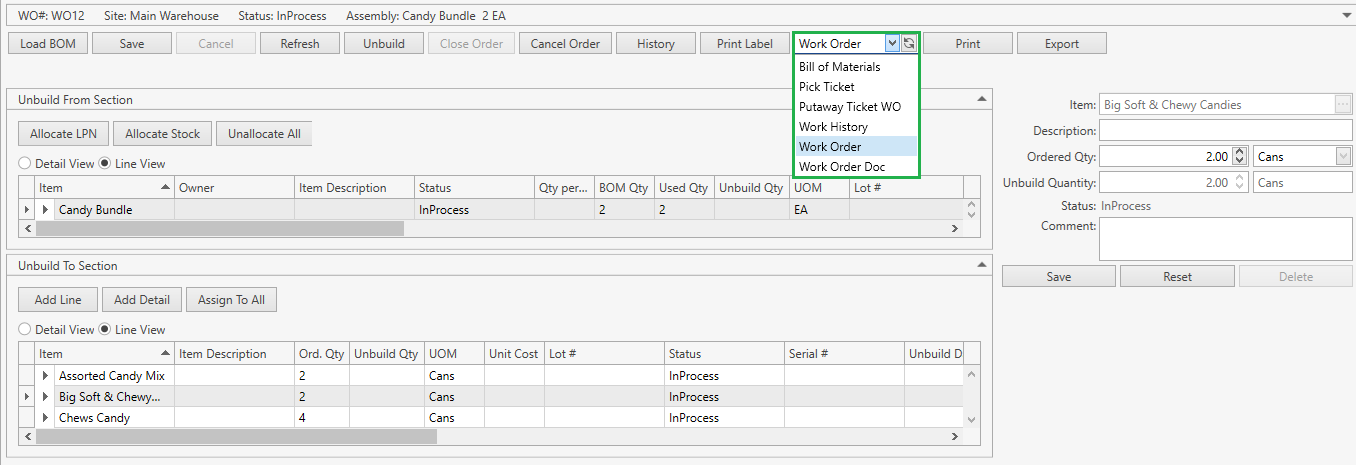
Select one of the following reports and click Print or Export button:
Bill of Materials: Report displays components (from Build From/Unbuild To section) of the selected assembly.
Pick Ticket: Report displays a list of allocated stocks that have to be picked up for kitting.
Putaway Ticket WO: Report displays a list of built assemblies/sub-products (for Build Work Orders) or a list of components (appearing as a result of the unbuilding operation for Unbuild Work Orders) grouped by Work Order Document. This report can be used for placing produced stocks in the warehouse.
Work History: Report displays the data on all build/unbuild operations within the current Work Order with the detailed information of each Work Order Document.
Work Order: Report shows the information on the order header, components, assembly and sub-products (if there are any).
Work Order Document: Report shows the information on selected Work Order Document. You should select the exact Work Order Document to be printed/exported: