Manufacturing Work Order
- Overview
- Add Order
- Edit Order
- Cancel Order
- Close Order
- Ordered Products
- Components
- Products Specifications
- Build
- Build History
- Reopen Order
- Print Labels
- Manufacturing Work Order Reports
Required Permissions
- View Manufacturing Orders
- ability to search and view Manufacturing Work Orders
- Modify Manufacturing Orders
- ability to add, view, edit, cancel and close Manufacturing Orders
- Allocate Manufacturing Orders
- ability to allocate/unallocate stocks (i.e. components) for Manufacturing Work Orders
- Build Manufacturing Orders
- ability to add, edit and delete products to be built and build them in Manufacturing Work Orders
- View Reports
- ability to print and export Manufacturing Order Reports
- View Cost
- ability to view Amount in Manufacturing Work Orders
- ability to view Unit Cost of products to be built in Manufacturing Work Orders
- Modify Cost
- ability to view Amount in Manufacturing Work Orders
- ability to view and edit Unit Cost of products to be built in Manufacturing Work Orders
Overview
Manufacturing is the irreversible process of creating products from one or more components when neither components nor their exact quantities are known in advance. Moreover, the final quantity of the products to be built can be also unknown before the production start. CoreIMS supports the manufacturing process through Manufacturing Work Orders.
Manufacturing Work Orders include the following sections:
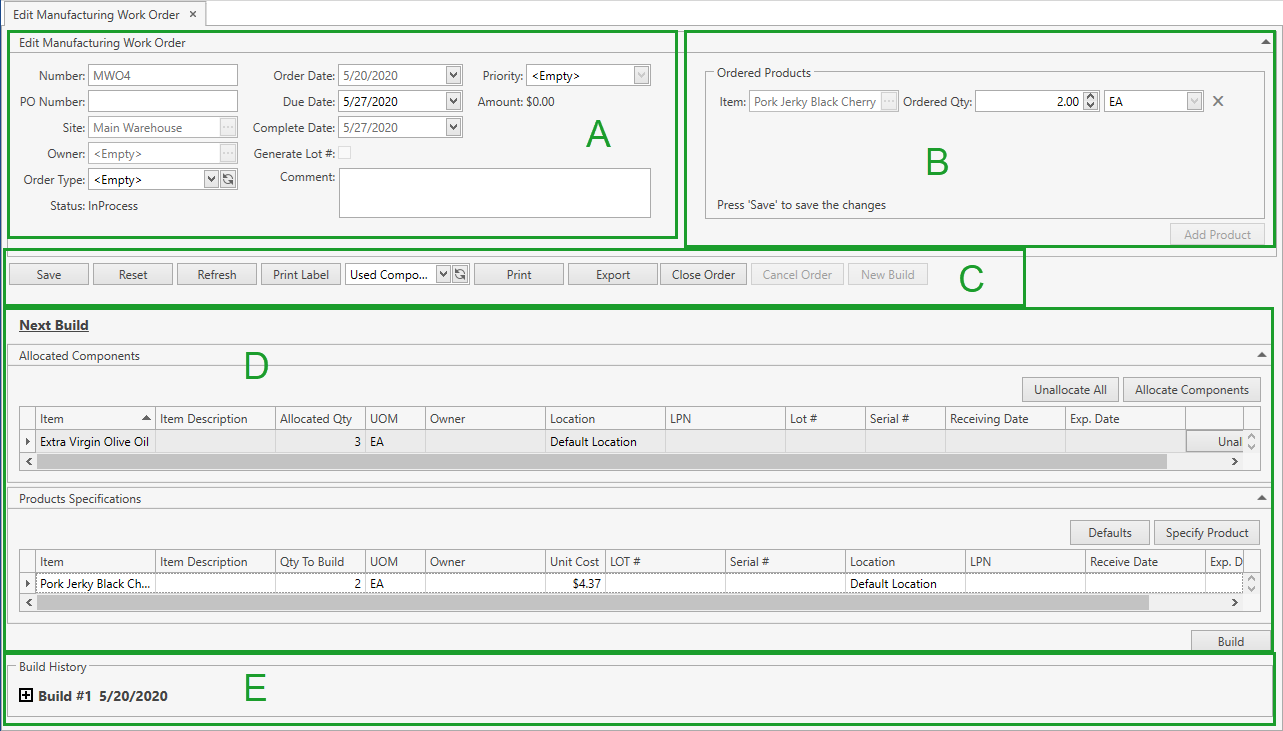
A: Order Header contains the general information about the order.
B: Ordered Products: you can specify one or more products to be built with their quantities. This is an optional action, the order can be processed without specifying any products in this section at all. Refer to Ordered Products section for more details.
C: Order Control Panel.
D: Next Build contains two subsections: Allocated Components and Products Specifications. Within the first subsection you can allocate components (i.e. stocks from the inventory), which should be used for building, and within the second one - specify products to be built, their quantities and some other attributes.
In these two subsections you can customize the view of the grid and use Ctrl+F for searching.
E: Build History: here you can view the info on already built products and components that were used for building within the current order. You cannot edit any data in this section. Refer to Build History section for more details.
Add Order
- Go to Orders tab of the main menu.
- Select Manufacturing Work Order -> Add Order menu item.

The following window will show up:

- Specify all the necessary attributes:
| Attribute | Required/Optional | Comment |
|---|---|---|
| Number | Required | Shall be unique across the system; CoreIMS prepopulates the field if Autonumbering Setting for Manufacturing Work Order is turned on. |
| PO Number | Optional | |
| Site | Required | Drop-down list of active Sites that you have access to. The necessary Site can be searched by the ellipsis button [...] as well. CoreIMS prepopulates the field, if you have a specified Default Site (please refer to Users section). |
| Owner | Optional | Drop-down list of active Companies marked as Owner. The necessary Company can be searched by the ellipsis button [...] as well. Visible only if Ownership mode is set up as Item Level or Stock Level in System Settings. If you (your CoreIMS user) have a specified Owner (please refer to Users section), you will be able to specify only this Owner or leave the Manufacturing Work Order without an owner. |
| Order Type | Optional | Drop-down list of Order Types. |
| Status | Required | Non-editable; CoreIMS auto populates the field with one of the following values: New, In Process, Closed, Canceled. |
| Order Date | Required | CoreIMS prepopulates the field with the current date. You can change it, if necessary. |
| Due Date | Optional | |
| Complete Date | Optional | Non-editable; CoreIMS auto populates the field with the current date when the Manufacturing Work Order gets into Closed status. |
| Generate Lot # | Checkbox | If checked, CoreIMS auto populates Lot # for products to be built according to Autonumbering Setting for Lot Number and you won't be able to change it. |
| Priority | Optional | Drop-down list of the predefined system values: Rush, Low, Medium, High. |
| Amount | Required | Non-editable; CoreIMS auto populates the field according to the following: Amount = SUM (Unit Cost * Built Qty) of produced products. |
| Comment | Optional | |
| Custom Fields | Optional | If Manufacturing Work Order has any Active Custom Fields. |
Click Save button:
Click Reset button to reset the unsaved changes.
Edit Order
After saving the changes in Add Manufacturing Work Order tab, you will be redirected to Edit Manufacturing Work Order tab:
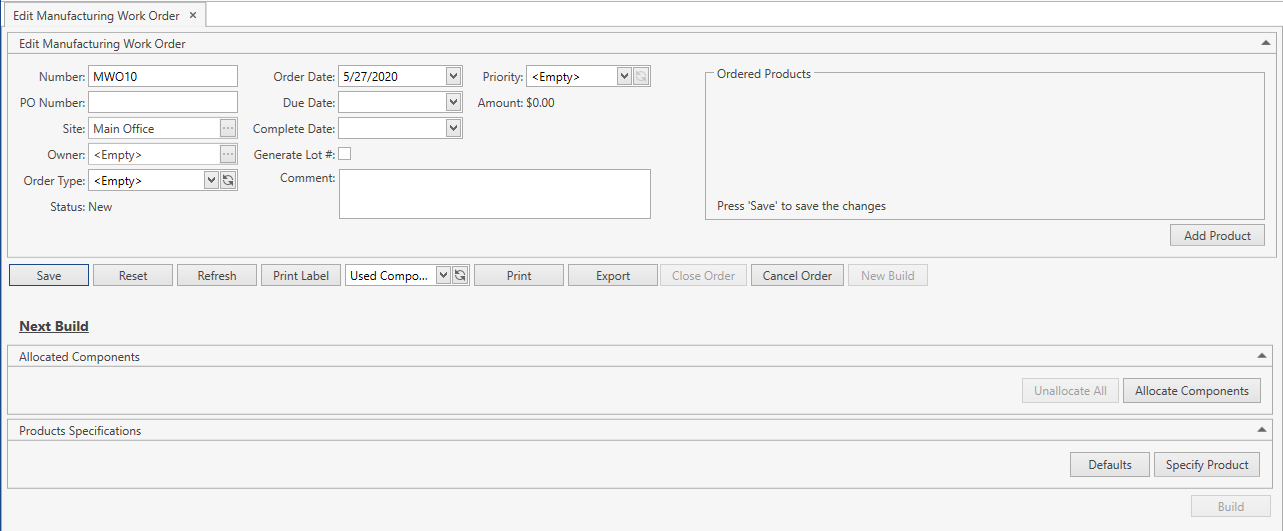
You can also get here from Search Manufacturing Work Order screen.
If the order header is collapsed, you can always expand it. Refer to this section for more info.
You can do the following:
Edit all the necessary order attributes.
Click Save button to apply the changes made within the order header.
Click Reset button to reset the unsaved changes within the order header.
Click Refresh button to reset the unsaved changes in the order header and update the displayed Manufacturing Work Order with the up-to-date values.
Use the following buttons:
Print Label – to print a label for order products;
Print or Export - to print or export Manufacturing Work Order Reports;
Close Order – to manually close the order if there are any built products;
Cancel Order – to cancel the order if there are no any built products;
New Build – to initialize a new building operation.
Allocate/unallocate components for the next building operation. Refer to Components section for more details.
Specify products to be built within the next building operation. Refer to Products Specifications section for more details.
You can optionally specify one or more products to be built with their quantities. Refer to Ordered Products section for more details.
Close Order
- Click Close Order button.
- Confirm the operation:
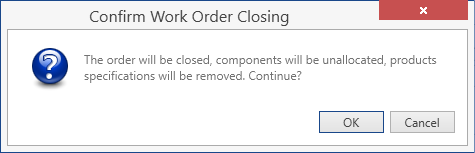
Once you confirm the operation, CoreIMS will do the following:
- unallocate components from Next Build section;
- delete products specifications from Next Build section;
- update Ordered Products section: Ordered Qty will be equal to Built Qty, if you specified any products in this section;
- hide Next Build section;
- assign to the order Closed status.
Even if the order was closed, you can always reopen it and initialize a new building operation. Refer to Reopen Order section.
Troubleshooting
- Close Order button is disabled.
Close Order button is enabled only if at least one product has been already built within the current order.
Cancel Order
- Click Cancel Order button.
- Confirm the operation:

Once you confirm the operation, CoreIMS will do the following:
- unallocate components from Next Build section;
- delete products specifications from Next Build section;
- update Ordered Products section: Ordered Qty will be equal to 0 if you specified any products in this section;
- hide Next Build section;
- assign to the order Canceled status.
Even if the order was canceled, it is still available in CoreIMS and you can search, view and edit it.
Troubleshooting
- Cancel Order button is disabled.
Cancel Order button is enabled only if no products have been built within the current order yet.
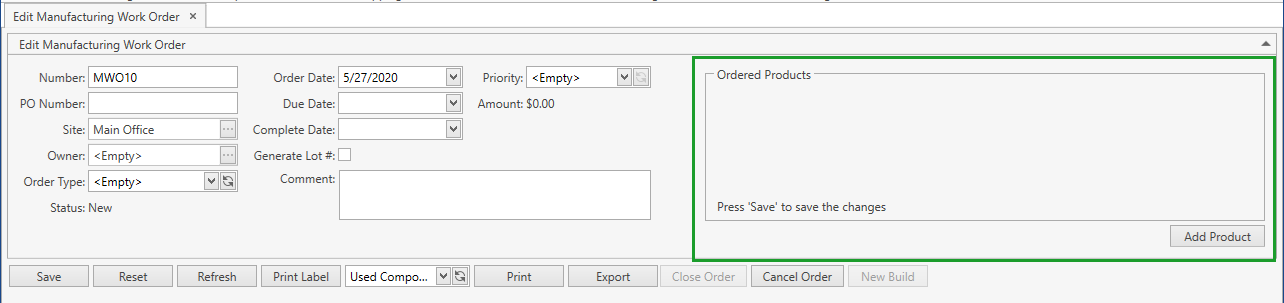
Ordered Products
You can specify the products that you are planning to manufacture within the current order in Ordered Products section:
- Click Add Product button.
- Specify Item, Ordered Qty and UOM of a product:
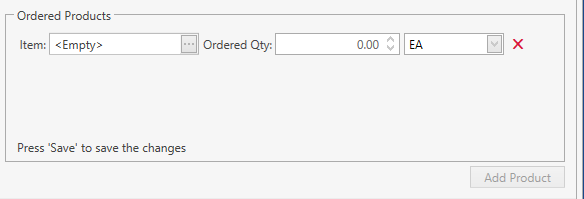
For serial-controlled items you can specify Ordered Qty only as a whole number.
Click Save button on the order control panel.
You can edit the ordered products records and delete them by clicking on
 to the right of UOM field:
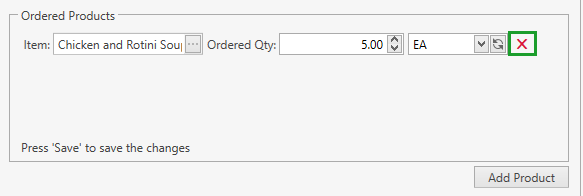
If at least one product has been already built within the current order (i.e. you have confirmed at least one building operation), you can't add any new products, delete already specified ones - you are only able to edit Ordered Qty in Ordered Products section. Please refer to Reopen Order section as well.
Components
Allocate Components
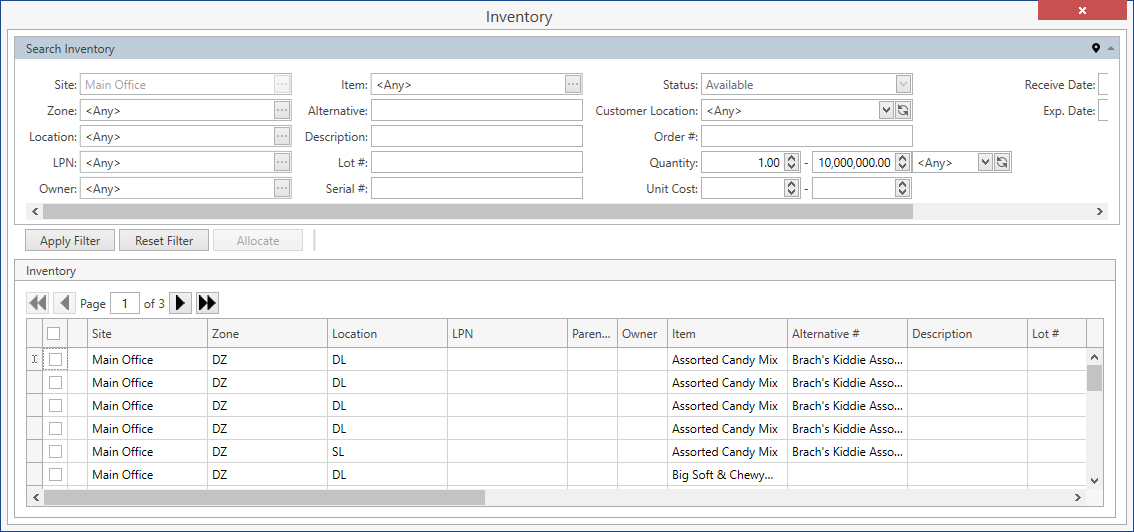
- Click Allocate Components button in Next Build section:

The following window will show up:
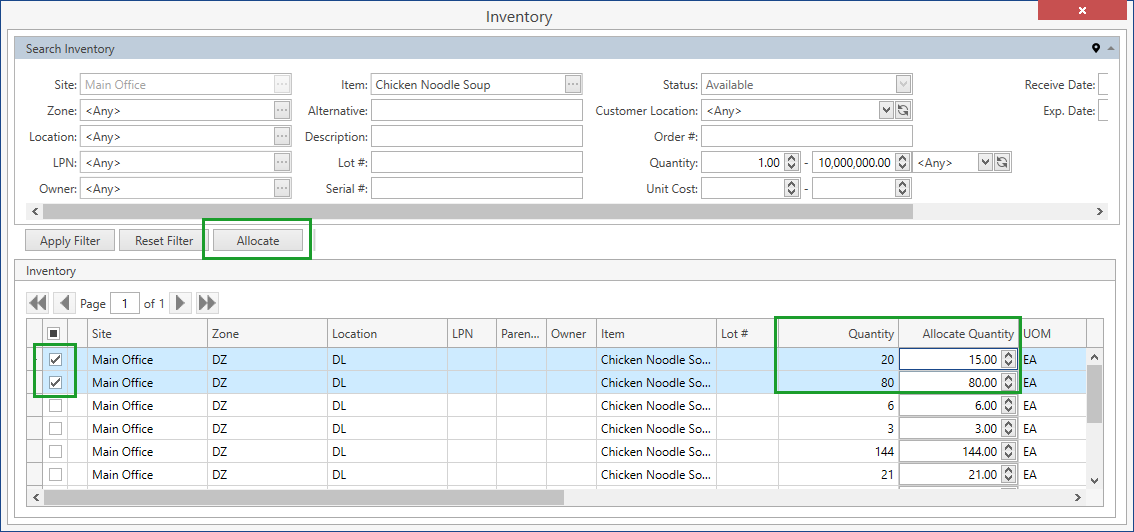
- Select all the necessary stocks that you want to use as components for building a new product(s) and then click Allocate button:
You can filter the inventory within Search Inventory frame to narrow down the list of stocks and pick up the necessary ones.
You don't have necessarily to allocate the whole quantity of the stock: you can specify the exact quantity to be allocated in Allocate Quantity column.
As a result, all of the selected stocks will be allocated to this order:

Before you confirm the building operation, you can always allocate more components or unallocate the unnecessary ones.
Unallocate Components
- Click Unallocate button on the line of the component you want to unallocate:
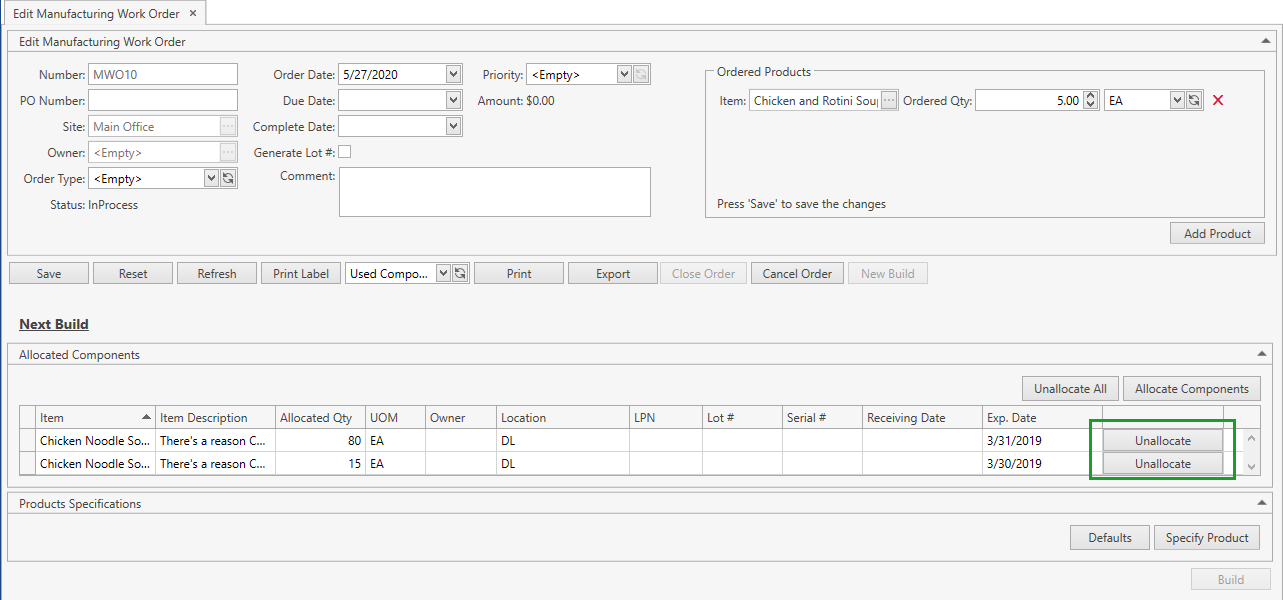
Alternatively, you can unallocate all of the components at once by clicking Unallocate All button.
Products Specifications
Specify Product
- Click Specify Product button in Next Build section. Specify Product frame will show up:
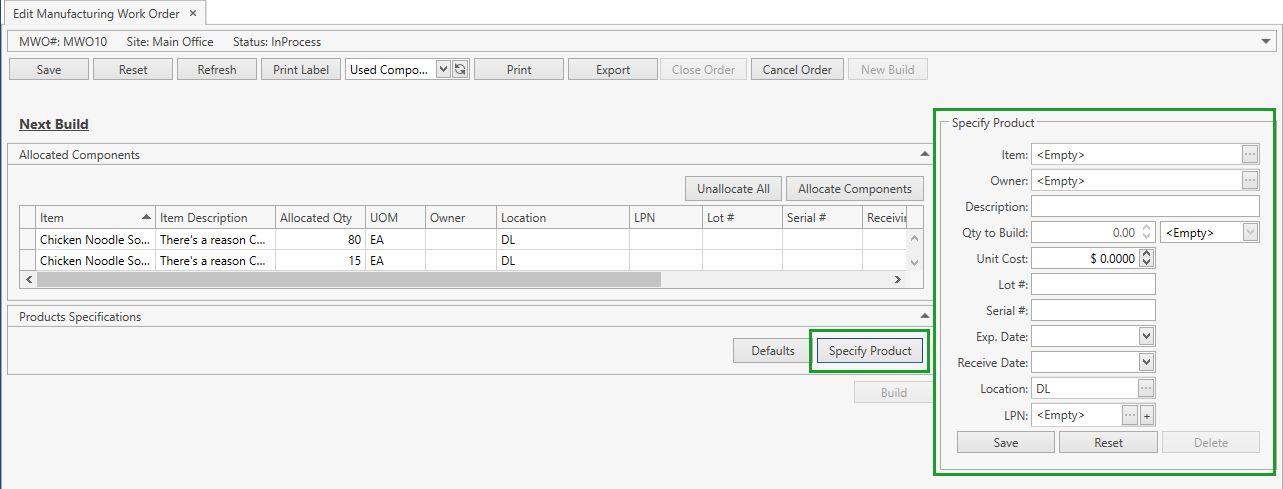
- Specify the product attributes according to the following:
| Attribute | Required/Optional | Comment |
|---|---|---|
| Item | Required | Drop-down list of active items. The necessary item can be searched by the ellipsis button [...] as well. If Ownership mode is set up as Item Level: if your CoreIMS user has a specified Owner (refer to Users section) and/or you selected an Owner in the order header, you will be able to select an item only of this Owner. |
| Owner | Optional | If Ownership mode is set up as No: non-visible. If Ownership mode is set up Item Level: non-editable; CoreIMS auto populates the field with Owner of the selected item. If Ownership mode is set up as Stock Level: a drop-down list of active Companies marked as Owner. The necessary Company can be searched by the ellipsis button [...] as well. If your CoreIMS user has a specified Owner (refer to Users section) and/or you indicated an Owner in the order header, you will be able to specify only this Owner. |
| Description | Optional | Non-editable; CoreIMS auto populates the field if the respective item has the specified description. |
| Qty to Build: Qty + UOM | Required | For serial-controlled items: Qty is non-editable for you; CoreIMS automatically populates this field according to the quantity of serial numbers. |
| Unit Cost | Optional | CoreIMS auto populates the field if Unit Cost is specified for the respective UOM in Item UOMs tab. CoreIMS automatically calculates the field if Auto Calculate Product Cost is checked in System Settings. |
| Lot # | Required* | *If the item is lot-controlled. If Generate Lot # is checked in the order header, the field will be non-visible for you and CoreIMS auto populates Lot # according to Autonumbering Setting for Lot Number. Lot # will be the same for all products built within one building operation and it will be displayed after you confirm the building operation. |
| Serial # | Required* | *If the item is serial-controlled. If Autonumbering Setting for Serial Number is turned on, you can generate Serial # for non-serial controlled items by clicking on  button near Serial # field. Refer to this section to view how to assign serial numbers for serial-controlled items. button near Serial # field. Refer to this section to view how to assign serial numbers for serial-controlled items. |
| Exp. Date | Required* | *If FEFO picking sequence is supported for the respective item. |
| Receive Date | Required* | *If FIFO or LIFO picking sequence is supported for the respective item. |
| Location | Required | CoreIMS prepopulates the field with the item Preferred Location if it is specified for the Site from the order header. Otherwise, CoreIMS populates this field with Default Location specified for the order header Site. |
| LPN | Optional | Drop-down list of LPNs located on the Site from the order header. The necessary LPN can be searched by the ellipsis button [...] as well. You can also add a new LPN and the product will be located on it. |
| Custom Fields | Optional | If Stock has any Active Custom Fields. |
- Click Save button. A new product specification will be added to the order:
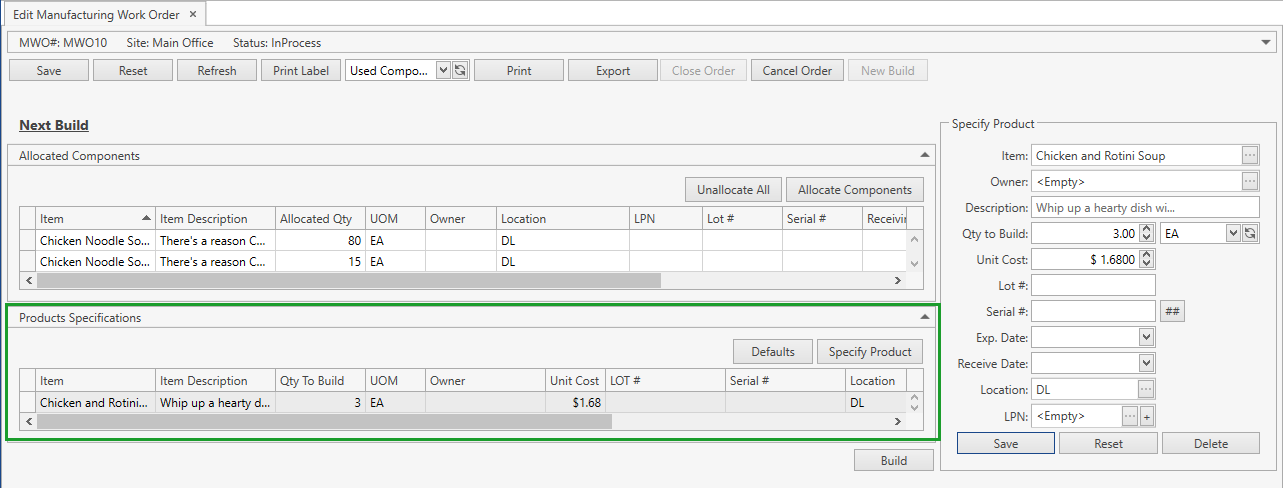
- Click Reset button if you want to cancel adding of a new product specification.
Before you confirm the building operation, you can always edit the product attributes, add more products and delete the unnecessary ones.
Defaults
If several products should have the same set of attributes, you can specify them:
- Click Defaults button. The following frame will show up:
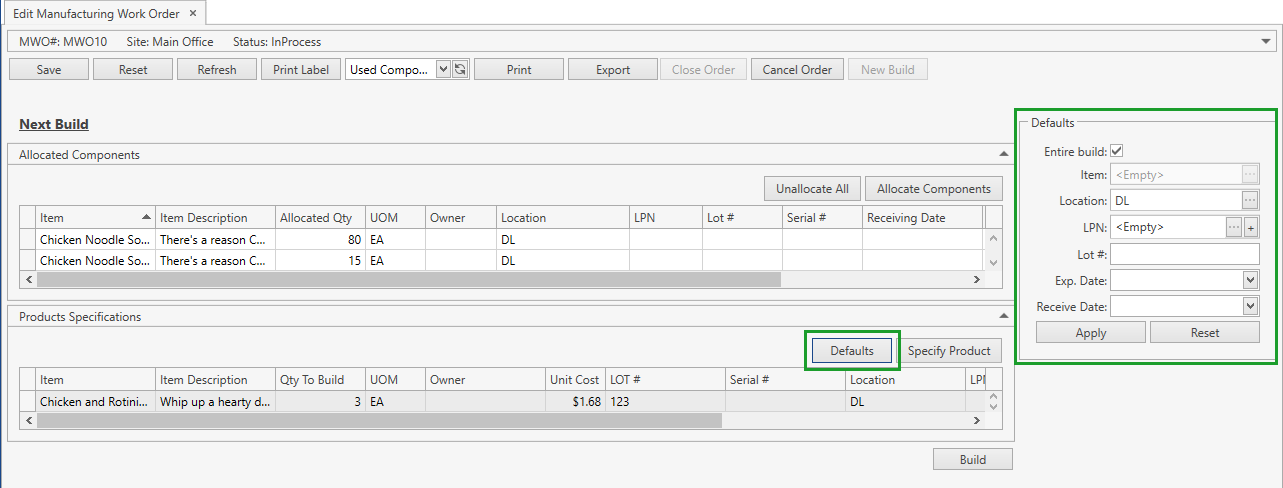
- Here you can specify:
- Location (CoreIMS prepopulates it with Default Location specified for the Site from the order header)
- LPN
- Lot#
- Exp. Date
- Receive Date
- Custom Fields (if Stock has any Active Custom Fields)
If you check Entire build flag, these attributes will be applied to all products within the current order; if you leave this flag unchecked, you will have to specify a particular item which these attributes should be applied to.
- Click Apply button to save the default values. Then when you add new product specifications, default values will be prepopulated, but you will be able to edit them, if needed.
Take into account the following:
- These default values are not stored anywhere and applied only to the current order within your current session. Once you log off or simply close the tab with the order, these settings will be lost.
- You can specify default values after you have added some product specifications. In this case previously specified values will be overwritten by default ones.
- In order to reset previously specified default values, specify them once again with blank fields and Entire build flag checked.
Build
Within Next Build section do the following:
- Allocate components that should be used for building a new product.
- Specify products you want to build.
- Click Build button:
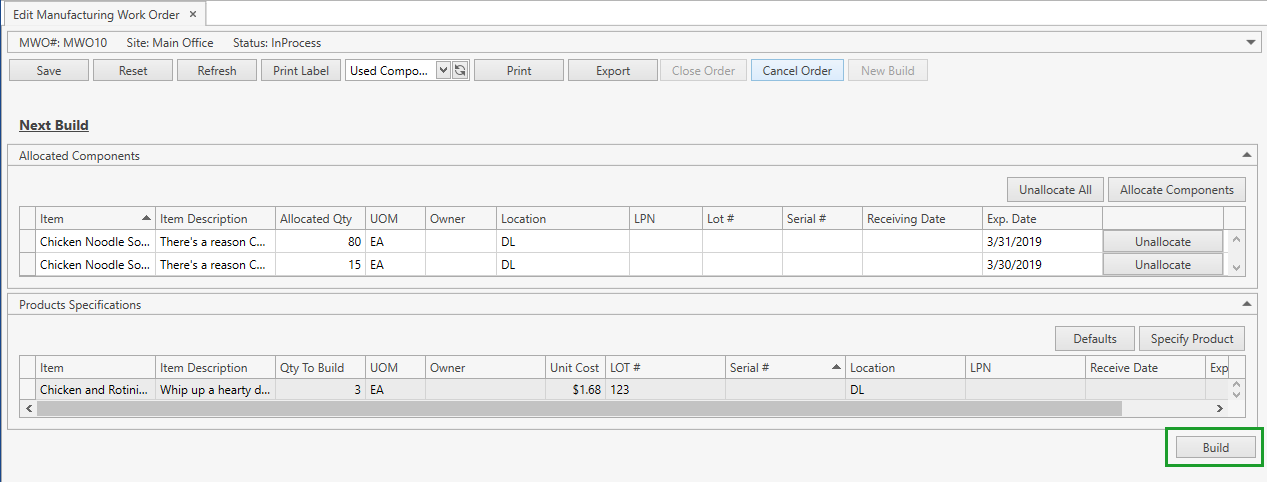
Once you confirmed a building operation:
- the related info is available in Build History section (refer to Build History for more details):

the order is automatically closed if all products specified in Ordered Products were built in full; moreover, you can close the order manually anytime;
all allocated components that were used for building are removed from Inventory and built products are available with a reference to the respective Manufacturing Work Order:

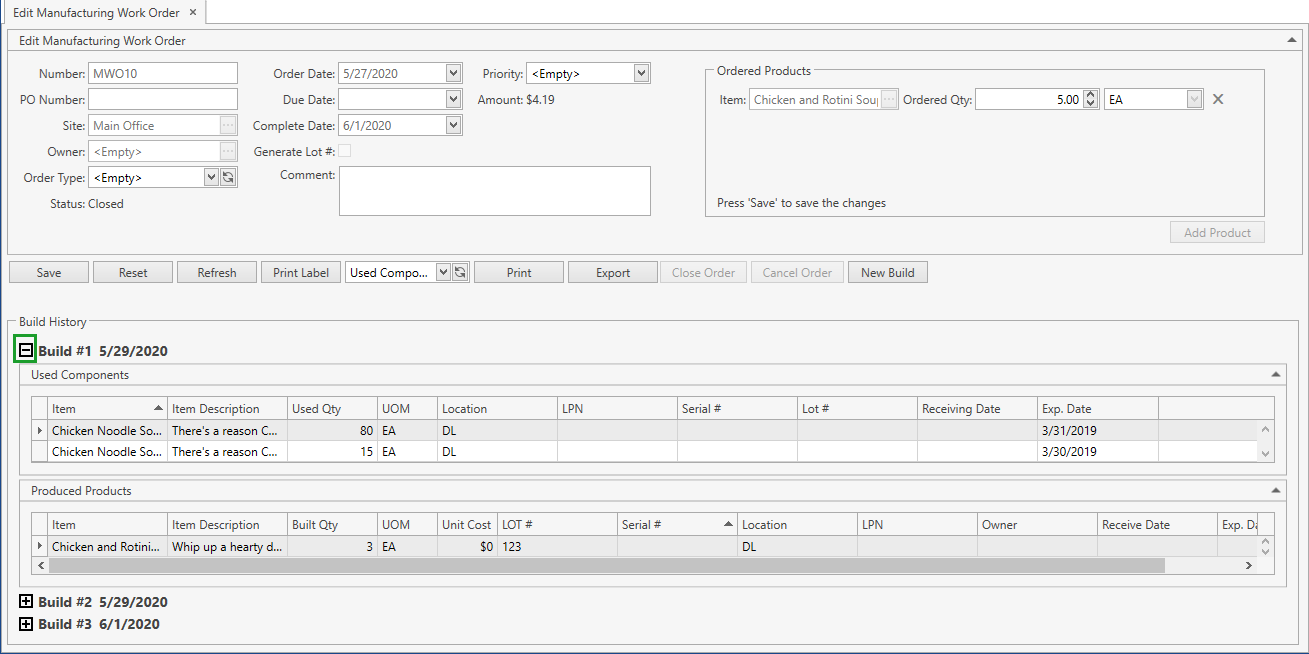
Build History
Build History section is available for you once you confirmed the first building operation within the current order. In this section you can view the data on already built products and components that were used for building them grouped in chronological order of building operations:
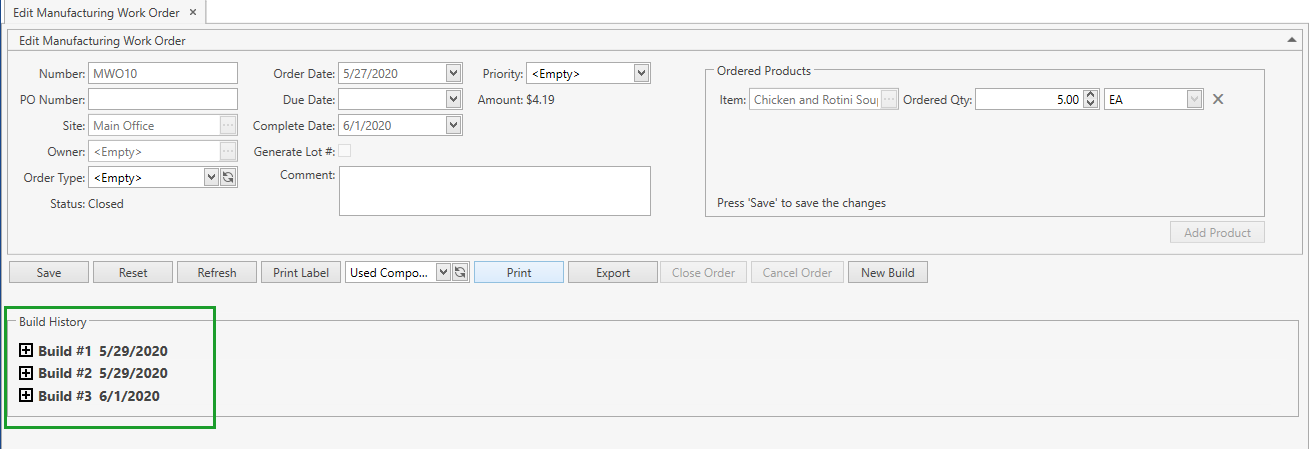
You can expand/collapse the info on a particular build by clicking on  /
/  button:
Reopen Order
There are two ways to reopen the order that has been already closed or canceled:
Click New Build button on the order control panel:
- Next Build section will show up;
- once you allocated some components and/or specified some products to be built, the order gets status In Process.
Increase Ordered Qty for a product specified in Ordered Products section:
- if the order has been closed, it gets status In Process; if it has been canceled - status New;
- click New Build button to initialize a new building operation.
Print Labels
In order to print labels for order products you need to do the following:
- Select the built product you want to print a label for (in case you need to print a label for the particular product, not for all of them) and click Print Label button on the order control panel. The following frame will show up:

Define the printing scope – whether you want to print a label(s) for:
- Selected Product (only One per Stock printing mode is available)
- All Products (all products built within the current order)
Select Printing Mode:
- One per Stock: labels are printed for each product that has already been built. The stock quantity on a label is equal to Built Qty.
- One per Item: labels are printed for each product that has already been built. The stock quantity on a label is 1 for each label. The number of printed labels is equal to Built Qty of the product and must be an integer.
Select Label Type:
- Item
- LPN
Select a printer.
Click Print button.
- Click Reset button to cancel the printing operation.
Manufacturing Work Order Reports
You can print or export the reports for the specific Manufacturing Work Order. These reports are available from the drop-down list highlighted in the screenshot below:
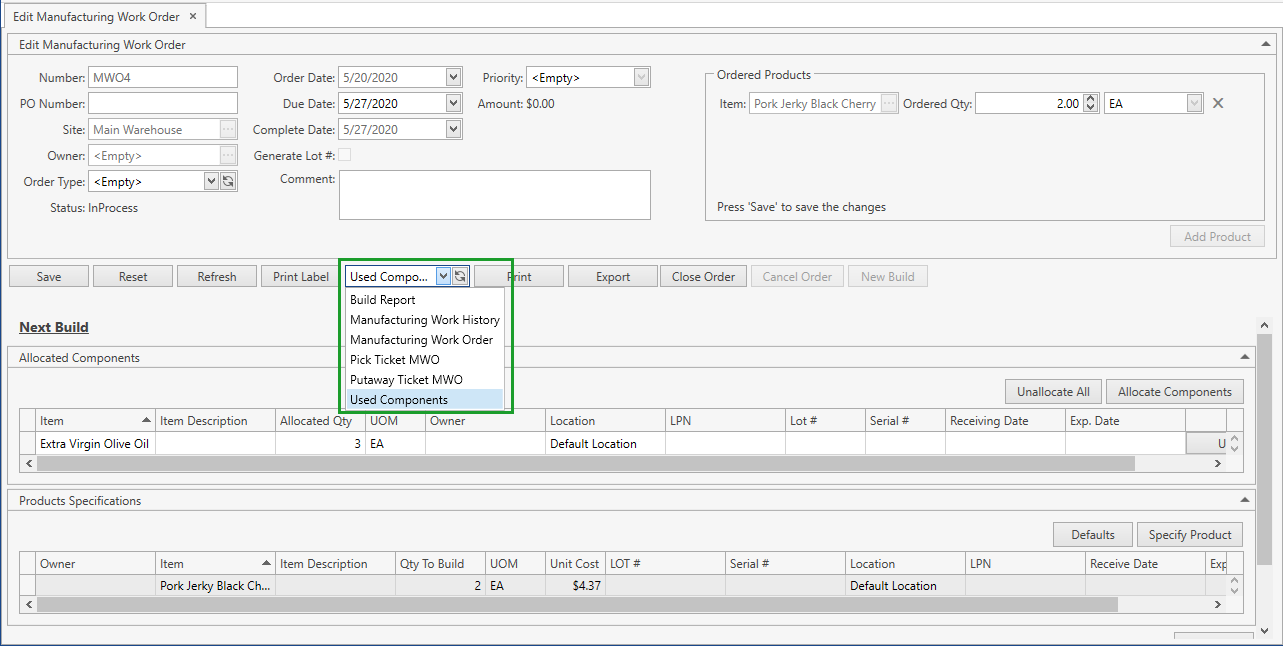
Select one of the following reports and click Print or Export button:
Manufacturing Work History: Report shows the order information: used components and built products grouped by Build #.
Manufacturing Work Order: Report shows the information on the order header, built products and used components.
Pick Ticket MWO: Report displays a list of allocated components (i.e. stocks) that have to be picked up and brought to the production line.
Putaway Ticket MWO: Report displays a list of product specifications (i.e. products to be built). You can use this report to place produced products in the warehouse.
Used Components: Report shows the information on all used components.
Build Report: Report shows the information on confirmed builing operations related to the order. You can select the exact Build # to be printed/exported:

If you leave Build # as < Any >, the report will display the information on all confirmed building operations grouped by Build #.